How to create an arcade platformer game for Tizen using phaser.js
PUBLISHED
Introduction
Phaser.js is nowadays one of the most popular and versatile web game engines. It is supported by a big community and a formidable developer team. Amongst many of its features is the quick setup process and ease of use. It is also worth mentioning that phaser.js is based on the very efficient canvas and WebGL rendering engine – pixi.js. Any developer can easily start making games with phaser.js utilizing javascript.
This article will cover the most important steps to create a simple arcade platformer game for Tizen using phaser.js. For an in depth view of the game mechanics, a sample LumberJack game application is provided with this article, tested on the Tizen SDK 2.2.1. The sample application was built using two libraries - phaser.js and stats.js for rendering performance measurement.
More information about Phaser can be found here. You can also find many useful examples here. As for the complete documentation of the phaser.js game engine, it can be found on this page.
Phaser setup
Before setting up the library itself you first need to change the screen-orientation parameter of the Tizen application to landscape mode as our platformer game will be displayed only in landscape mode. You can do that in the config.xml file as shown below.
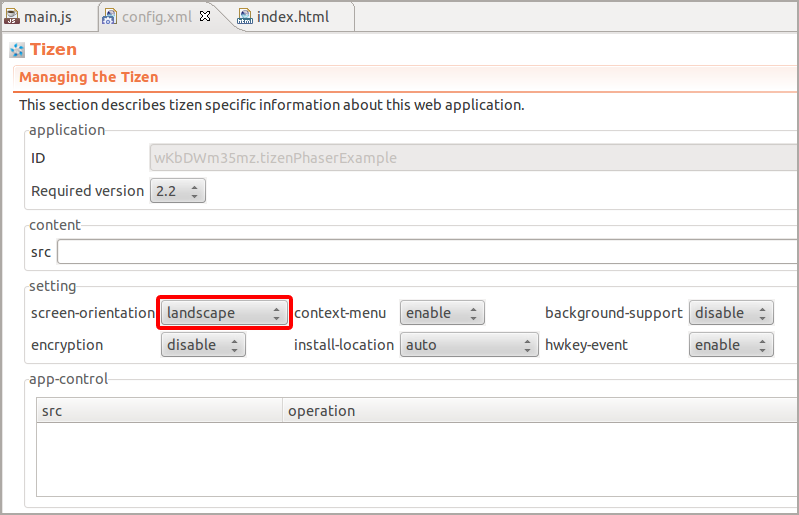
Figure 1 - changing the screen orientation
You setup phaser.js very easily. First of all you need to add the phaser.js library path into your main html document script tag.
<script src="js/phaser.min.js"></script>
From now on you are able to use the power of phaser.js to code your game in JavaScript. First of all we need to create a new Phaser.Game object, with the following parameters: the width and height of the game board and the type of rendering. There are two rendering modes provided behind the hood in phaser.js by pixi.js. These are Phaser.CANVAS and Phaser.WEBGL. You can specify also Phaser.AUTO for automatic detection of the rendering mode, with priority for WebGL rendering if available and fallback to canvas mode, if WebGL is not supported by the device. The next parameter to pass is the DOM element id to render the content to. But you can leave only parentheses for the sake of this project. The following is a very important parameter: you need to pass an object with key-value pairs for defining the crucial phaser game life cycle functions. You can find the basic phaser.js code template for the LumberJack game below. Please note that our game height equals the window.innerWidth parameter and our game width equals the window.innerHeight parameter. This is not a mistake, it is a necessity as we are in landscape mode.
var game;

[…]

var gameHeight, gameWidth;

[…]

gameHeight = window.innerWidth;
gameWidth = window.innerHeight;

game = new Phaser.Game(gameWidth, gameHeight, Phaser.CANVAS, '', {preload: preloadGame, create: createGame, update: updateGame, render: renderGame});

function preloadGame() {
[…] // in this function preloading of the game assets takes place
}

function createGame() {
[…] // in this function we compose our stage with sprites, tile maps, etc.
}

function updateGame() {
[…] // this function is our main render loop of the game, the whole game logic goes here.
}

function renderGame() {
[…] // this function is not mandatory, but you can use it for performance measurement and on screen debugging.

}
Loading the game assets
In order to make a game you need graphics. In order to have graphics you need to load them to your game inside the preloading function, which in case of our LumberJack game is preloadGame(). Phaser incorporates neat methods to ensure that preloading game assets is fast and easy. In our example, the LumberJack game we use two kinds of assets. These are images and spritesheets. Spritesheets are also images, but they contain sequenced images of animation. You can see what a spritesheet looks like on figure 2 in this article. You load images and spritesheets by using the load.image() and load.spritesheet() methods on a game object. Then in the parameters you specify a string which will be our asset name inside the Phaser engine, so we can easily reference that asset later. The second parameter is the path to the asset. For the spritesheet you should also specify the width and height as the third and fourth parameter in the load.image() method, as Phaser needs to know how big each animation frame is, provided in the spritesheet. There are also other parameters like margins, spacing and frameMax which you can read more about in the documentation.
[…]

function preloadGame() {

      game.load.image('background', 'images/bg.png');
      game.load.image('left', 'images/left.png');
      game.load.image('right', 'images/right.png');
      game.load.image('up', 'images/up.png');
      game.load.image('rock', 'images/log.png');
      game.load.image('ground_tile', 'images/floor_tile.png');
      game.load.image('hud', 'images/hudPoints.png');

      game.load.spritesheet('player','images/phaserPlayerSpriteSheet.png', 36, 36);
      game.load.spritesheet('collectable','images/itemSpriteSheet.png', 36, 36);

    }

[…]
![]()
Figure 2 – the LumberJack player movement spritesheet
In order to display game assets inside the game you need to create a new variable, named for example “player”, and assign a new sprite, created through the game.add.sprite() method, to it. And as mentioned earlier in the article, you can now use the in game name of the asset in that method to display it on the game stage, just like in the example provided below. It puts our spritesheet on the stage with the player animation at coordinates 100px in width of the screen and 200px in height of the screen.
[…]

player = game.add.sprite(100, 200, 'player');

player.animations.add('left', [0, 1, 2, 3, 4], 10, true);
player.animations.add('right', [6, 7, 8, 9, 10], 10, true);

[…]
As you can see you can also add named animations based upon the spritesheet. In the above example, two character animations have been created. One named “left” and the other named “right”. They are the players’ walk cycle. You have to provide an array of frame numbers corresponding to the sequence of the frames that should be played for each of them from the spritesheet. You also have to specify the total frame number of frames in the spritesheet and set whether the animation should loop or not. This is done with a boolean variable. To start playing or stopping the players’ animation you just need to type in the following commands:
[…]

player.animations.play('left');

[…]

player.animations.stop();

[…]
Applying game physics
The major added value of phaser.js is that the library provides different physics engines for developers. You can easily specify which one you want to use and build quick prototypes of your games in minutes. As for now, three different physics engines are available. The ARCADE physics engine, created mainly for platformer, “Super Mario”-like games. The p2 engine which gives you full control of physical bodies with sophisticated collision system and the N+ engine, called the Ninja physics engine. The last one is a simplified version of the p2 physics engine. The future versions of Phaser will also feature the famous Box2D physics engine and the Chipmunk physics engine. Our LumberJack example game uses the ARCADE physics engine, so in this article we will focus on showing how to set this engine up for developing.
Actually the initialization of the engine just needs one line of code in the createGame() function of the LumberJack game. You can also specify the world gravity for an ARCADE engine.
[…]

game.physics.startSystem(Phaser.Physics.ARCADE);
game.physics.arcade.gravity.y = 500;

[…]
After executing this piece of code you will be able to use the body variable of any sprite object to apply certain physical behavior on that particular sprite. For example we can tell the body of our player to collide with the bounds of our physical world, so the player won’t fall out of the screen. We can also specify that the world gravity should affect the player. Or make the player immune to being moved by other physical bodies. You can also set that in the createGame() function. Below are some examples.
[…]

player.body.allowGravity = true;
player.body.immovable = false;
player.body.collideWorldBounds = true;

[…]
If you want certain physical bodies to collide you must set up collisions inside the engine. You can do that by using the collide() method like in the following example, which sets collisions between the player in the LumberJack game and the level tiles. Remember that collision checking or moving bodies using velocity needs to be placed inside the updateGame() function of the Phaser engine, since it must be checked continuously.
[…]

game.physics.arcade.collide(player, layer1);

[…]

player.body.velocity.x = 200; // this will move the player body right

[…]
You can also apply a collision handler to game.physics.arcade in order to perform operations when a collision occurs between any objects. In the LumberJack game the collision handler is applied to check collisions between the player and the group containing the collectible items. After a collision occurs between the player and any of the objects in the itemGroup, the game adds points and destroys the collectible object with the kill() function. The following code describes this.
[…]

game.physics.arcade.collide(player, itemGroup, collisionHandler, null, this);

[…]

function collisionHandler(player, item) {

    points++;

    pointsTxt.setText("COLLECTED:\n" + points);
    item.kill();

}

[…]
Adding the tile map ground and platforms
Every platformer game needs platforms for the hero to walk on. In order to build them you can use tile maps from the Phaser engine. Tile maps are easy to use and save time in level building for any type of tile based game. In order to use tile maps, we first need to create an empty tile map by using the game.add.tilemap() method in our createGame() function. The second step is to assign a tile image to our tile map - you can achieve this with the addTilesetImage() function on the previously created tilemap. The first parameter to pass is the tileset name. As the LumberJack example game doesn’t use tilesets from external editors, you can omit that parameter by passing the null value. The second parameter is the name of the earlier loaded asset which will represent our tiles. The third and fourth parameters are the width and height of the tile image. You will then need to setup an empty tile layer. You can do that by using the create() method on your map. The first parameter stands for the name of the layer which will be registered in the Phaser game engine. You will then need to specify parameters of the width and height of the game level, measured in tiles. The last two parameters tell the game engine how big (in pixels) the tiles should be. The last thing to do before building our world from tiles is to resize the world by invoking the resizeWorld() method on our layer object. This sets the Phaser physics world size to match the size of our tile layer.
[…]

map = game.add.tilemap();
map.addTilesetImage(null,'ground_tile', 36, 36);

layer1 = map.create('layer_1', 50, 10, 36, 36);
layer1.resizeWorld();

[…]
Having created an empty tile map, the next thing to do is to make some tile based ground and platforms for our game. You can load whole levels into Phaser, designed in tile editors, and then export them in the json format. But this article shows a simpler way of putting in tiles manually. As shown in the following example, you can put tiles invoking a putTile() function on the current tile map. The first parameter of the function describes the index of the tile in the tile system. The second parameter and the third parameter tell Phaser on which x coordinate and on which y coordinate in the tile system Phaser should put the tile on the tile map. Both coordinates are measured in tiles, not pixels. The last parameter describes on which tile layer Phaser should put the currently created tile. The last thing to do is to set which tile types (based on the tile index) in the map are meant to be physical colliders. You can achieve that by using the setCollision() function on the tile map object. The first parameter of the function needs to be filled with an existing index of tiles put earlier with the putTile() function. This will tell Phaser which tiles should be the colliders. The next parameter is a boolean value and describes if the collision is active or not. For our LumberJack game it must be set to true. The last parameter describes which layer will be affected with colliding. You must put a string with the layer name there.
[…]

(var i=0; i<50; i++) {
    map.putTile(0, i, 9, 'layer_1');  // GROUND
}

for (var i=10; i<19; i++) {
    map.putTile(0, i, 7, 'layer_1');  // PLATFORM 1
}

for (var i=20; i<26; i++) {
      map.putTile(0, i, 5, 'layer_1');  // PLATFORM 2
}

for (var i=28; i<31; i++) {
      map.putTile(0, i, 3, 'layer_1');  // PLATFORM 3
}

for (var i=32; i<39; i++) {
      map.putTile(0, i, 7, 'layer_1');  // PLATFORM 4
}

for (var i=43; i<50; i++) {
      map.putTile(0, i, 4, 'layer_1');  // PLATFORM 5
}

map.setCollision(0, true, 'layer_1');

[…]
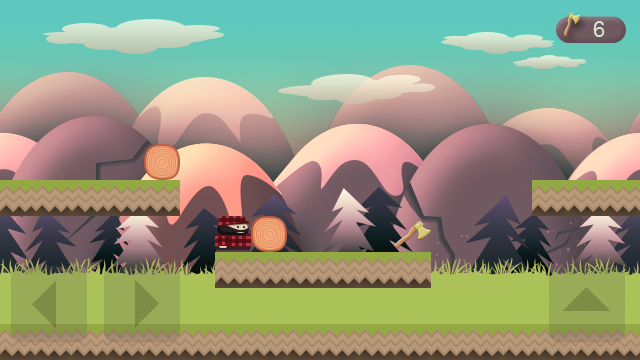
Figure 3 – final preview of the LumberJack example game
Summary
In this article we have showed you how to create the most important parts of a platformer game in phaser.js for Tizen. You have learned how to setup the library and how to prepare the game stage. You have also obtained the knowledge about preloading game assets such as images and spritesheets and putting them on a game stage. Finally you have learned how to apply arcade game physics with collision handling and how to use tile maps for building your game level. We hope you will find this information helpful in creating your own Phaser based games for Tizen. For further information about building an arcade platformer game please refer to the LumberJack game source code provided with this article.