Close range data sharing with NFC on Tizen
PUBLISHED
Near Field Communication
Near Field Communication (NFC) is an international standard ISO/IEC 18092 that specifies an interface and protocol for simple wireless connection of closely coupled devices. There are three groups of application scenarios for NFC:
- device close to a wireless tag
- device close to other device (peer-to-peer)
- device close to point of sales terminal
The sample application, described in article, belongs to second group of applications: peer-to-peer.
You can find more information about NFC here: http://www.nfc-forum.org/.
Sample application features
The ShareContacts sample application demonstrates how to use Tizen platform’s NFC, Contact, Messaging and Filesystem APIs.
After startup, the application displays a list of all contacts stored within the default address book, sorted by the ‘First Name’ attribute. Every element on the list is registered to handle the ”swiperight” and ”swipeleft” events. A “swipeleft” event displays messages from the selected contact’s number. You can check one or more messages from the list. A ”swiperight” event adds the selected contact to the list of contacts that we want to send. You can send one or more contacts and one or more messages simultaneously. After clicking the “Send” button, if the second target is detected and you test the sample application:
- using two devices: a NDEF message (described later) is sent from the first to the second device. Additionally, payloads of records included in NDEF messages are saved to the “nfc-data” file in the file system of the first device (if file doesn’t exist, it is created, otherwise - overwritten). Received data is displayed in the application on the second device.
- on the Emulator: payloads of records included in NDEF message are stored in the “nfc-data” file in the file system of the emulator. How to simulate receiving the NDEF message by the emulator is described later.
This sample application uses the jQuery Mobile 1.2.0 framework, includes the jQuery 1.8.0 library and was tested on Tizen SDK 2.1.0.
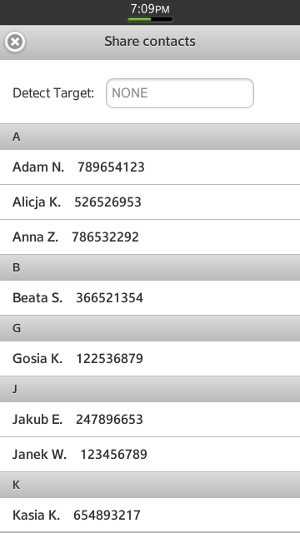 Figure 1: Sample Application screenshot
How to test application on the emulator using Event Injector?
To send anything by the NFC the target should be detected. In case of the Emulator you can use the Event Injector provided by Tizen SDK (Window->Show view -> Event Injector).
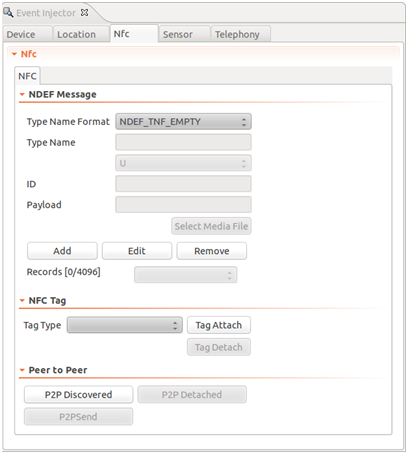 Figure 2: Event Injector: NFC view
In order to discover the new device on the emulator, you should click P2P Discovered in the Peer to Peer section. You can now send NDEF messages from/to the emulator.
Sending NDEF message from the emulator
The Event Injector doesn’t receive NDEF message sent by the emulator. So we need to create a separate testing path for launching the application on the emulator. This path consists of writing the payloads of records included in NDEF message to a file system that can be read by the user and then sent back to the emulator. In other words the application launched on the emulator sends NDEF messages to its own. A way to send NDEF message from the emulator is shown in the figure below:
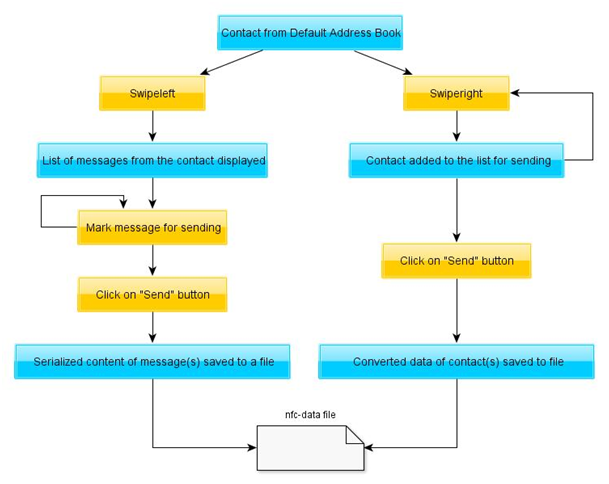 Figure 3: Diagram of sending NDEF message
To see the data saved in the ‘nfc-data’ file you should use the Connection Explorer view.
|
The Connection Explorer view shows the devices and emulators connected to the SDK. It provides the following actions for connected devices and emulators:
|
You can explore the file system on the emulator and find the file saved by the sample application (location: opt > media > Documents > nfc-data).
You can transfer the file between the connected device (in this case the emulator) and the host system. To do this, pull the selected file to the desired host system path.
 Figure 4: Pulling a file from a connected device
The file contains only payloads of the last sent NDEF message’s records. The file structure is as follows:
Identifier of the NDEF Record: Content of the NDEF Record
You can use the “Content of the NDEF Record“ as a payload of the new NDEF message from the Event Injector to the emulator.
Sending NDEF message to the emulator
To send an NDEF message to the emulator you need content for the payload of the NDEF message. For this purpose you should first send an NDEF message from the emulator (as seen in the previous chapter) or use this one:
BEGIN%3AVCARD%0D%0AVERSION%3A3.0%0D%0AN%3AJ.%3BMaria%3B%3B%3B%0D%0AFN%3AMaria%20J.%0D%0AORG%3A%0D%0ATEL%3BVOICE%3BVOICE%3BPREF%3A123456789%0D%0AEND%3AVCARD%0D%0A
To send an NDEF message to the Emulator:
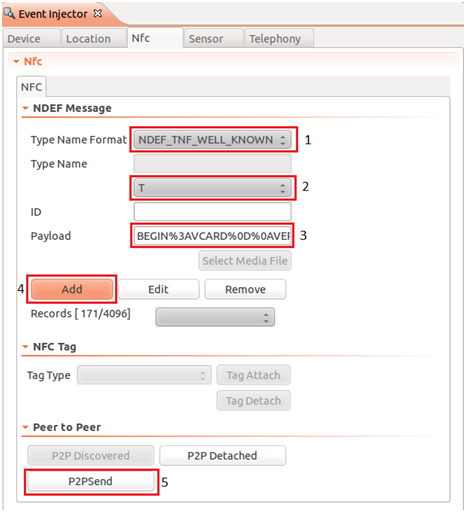 Figure 5: NDEF Message section
In the NDEF Message section:
- Select the record type name format: NDEF_TNF_WELL_KNOWN;
- Enter the record type name: ‘T’;
- Enter the payload (described earlier);
- Click Add.
Structure of NDEF Message will be described later ("Creating and sending NDEF Message" section).
Note: Remember to change the record type name to ‘T’ (default is ‘U’). ‘T’ stands for text data.
You can add multiple NDEF records if required for the NDEF message (maximum: 5).
To send an NDEF message to the emulator, you should click P2P Send [5] in the Peer to Peer section (click P2P Discovered if this option is not enabled).
If everything goes fine the sample application launched on the emulator should display the received NDEF message’s data.
Note: One NDEF message sent to the emulator can consist of either contact(s) or sms message(s). You cannot mix NDEF records containing sms and NDEF records containing contacts in one NDEF message. This is not supported by the sample application.
How to test application using two devices?
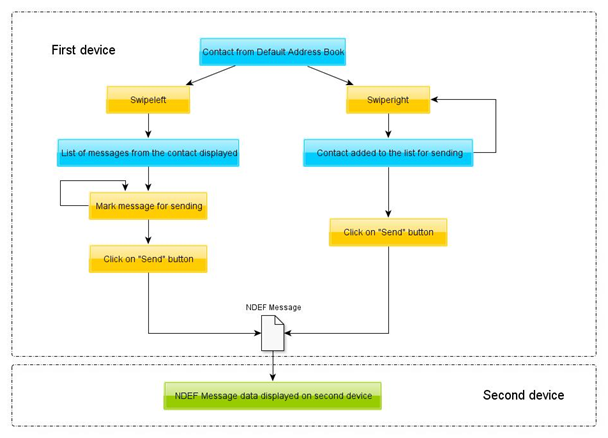 Figure 6: Diagram of sending NDEF message using two devices
To test sample application using two devices:
- Start the sample application on both devices and move them close to each other, after that target should be detected.
- Add contact(s) or message(s) for sending and click the “Send” button.
- Received NDEF Message’s data should be displayed by the sample application launched on second device.
Application Configuration
To use the Tizen API’s features mentioned in the article, you must declare the necessary features in the config.xml file. For this purpose:
- Open the config.xml file.
- Choose the Privileges tab.
- Check or add features:
- http://tizen.org/privilege/contact.read
- http://tizen.org/privilege/contact.write
- http://tizen.org/privilege/filesystem.read
- http://tizen.org/privilege/filesystem.write
- http://tizen.org/privilege/messaging.read
- http://tizen.org/privilege/messaging.write
- http://tizen.org/privilege/nfc.admin
- http://tizen.org/privilege/nfc.p2p
- http://tizen.org/privilege/nfc.common
You can find more information about privileges and the API in the Documentation.
NFC API
Power the NFC device
Before you can work with the NFC, you should get the default NFC adapter on the device and set it to powered state.
var nfcAdapter;

var onPowerOnFails = function(e) {
    tlib.logger.err('PowerOn error: ' + e.name + " : " + e.message);
};

try {
    nfcAdapter = tizen.nfc.getDefaultAdapter();
    callbacks = callback;
    nfcAdapter.setPowered(true, detectTarget, onPowerOnFails);
} catch (e) {
    nfcAdapter = null;
}
To get the default NFC adapter on the device you can use the tizen.nfc.getDefaultAdapter() method. Then you can control local NFC behavior: turn the NFC adapter on/off or poll for targets. To power the adapter, you must use the setPowered() function. This method takes the following parameters: the state of the NFC adapter, which you want to set (boolean), success (detectTarget) and error (onPowerOnFails) callback functions. Callbacks are optional.
Detecting other device
The detectTarget() method invokes the setPeerListener() method to register a callback function to be invoked when the NFC peer-to-peer target is detected (onSuccess). In case of failure, an error callback function (err) is invoked.
try {
    nfcAdapter.setPeerListener(onSuccess, err);
} catch (e) {
    tlib.logger.err(e.name + " : " + e.message);
}
The onSuccess() method specifies the onattach callback function, invoked when the device becomes available and the ondetach callback function – when it becomes unavailable.
var nfcTarget;

var onSuccess = {
    onattach : function sucAttach(target) {
        nfcTarget = target;
        nfcTarget.setReceiveNDEFListener(onreceive, err);
        callbacks.onattach();
    },

    ondetach : function() {
        nfcTarget = null;
        callbacks.ondetach();
        nfcTarget.unsetReceiveNDEFListener();
    }
};
Connecting the target invokes the onattach function, which:
- receives a NFCPeer object representing the target device; the NFCPeer object is assigned to the global variable nfcTarget,
- calls the setReceiveNDEFListener() method.
The setReceiveNDEFListener() method registers a callback function to be invoked when the NDEF message is received from the connected NFC peer-to-peer target. This method takes two parameters: success (onreceive), invoked in case of successfully receiving the message and error (err) callbacks.
The callbacks.onreceive() method looks as follows:
onreceive: function(message) {
    if (message.records[0].text.substring(0, 3) === "sms")
        messageManager.handleMessageReceive(message);
    else
        contactsManager.handleContactReceive(message);
}
The above functions are described later.
When the device becomes unavailable the ondetach() function is invoked. It assigns a null value to the global variable nfcTarget and invokes the unsetReceiveNDEFListener() method, which unregisters the listener for receiving NDEF messages from the NFC peer-to-peer target connected. You can set and unset the listener, any number of times during the application lifetime.
Creating and sending NDEF Message
Using the NFC standard developer may transfer any kind of text or binary data. Usually the sent data format is called NFC Data Exchange Format (NDEF). NDEF defines a common data format between the NFC devices, and tags. For more information, see the Web page about NDEF.
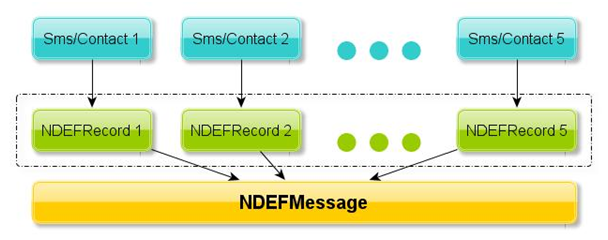 Figure 7: Structure of the NDEF message in sample application
In case of our sample application the NDEF message is composed of records and every record contains either sms message or contact.
|
|
|
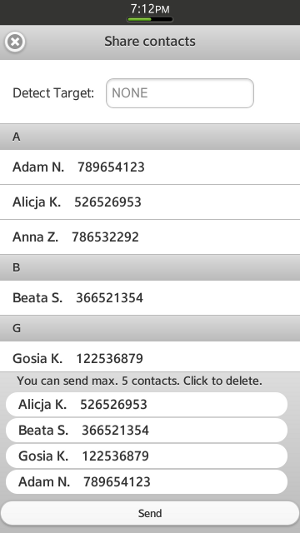 Figure 8: Sending contacts by NFC
 Figure 9: Sending messages by NFC
The sample application uses the NFC adapter. After clicking the “Send” button, the sample application checks if the second device is attached. If so, the NDEF message is sent. Otherwise, the relevant popup message is displayed.
To send an NDEF message, the sample application uses the sendTextNDEF() function. It takes two parameters:
- the recordsToSend array containing contacts/messages’ bodies converted to Strings
- Object type that handles the success (callback.success) or failure (callback.error) of the sending operation.
The code of the method is shown below:
sendTextNDEF : function(recordsToSend, callback) {
    var textRecords = [];

    try {
        for ( var i = 0; i < recordsToSend.length; i++) {
            textRecords.push(new tizen.NDEFRecordText(
                    encodeURIComponent(recordsToSend[i]), 'en-US',
                    'UTF16'));
            (...)
        }

        var ndefMessage = new tizen.NDEFMessage(textRecords);

        nfcTarget.sendNDEF(ndefMessage, callback.success,
                callback.error);

        (...)
    } catch (e) {
        tlib.logger.err("Error: " + e.message);
    }
}
The encodeURIComponent() method encodes special characters in the recordsToSend array. Encoded String is used as the first parameter to create a NDEF Record object. The second and third parameters are: the language code string value ('en-US') and encoded type ('UTF16'). Created NDEFRecordText objects are put into the textRecords array. The sample application uses this array to create the NDEF message. When the message is created, it is sent to the NFC peer-to-peer target device using the nfcTarget.sendNDEF() method. This method takes three parameters: NDEF message to send (ndefMessage) and two callback functions, that handle the success (callback.success) or failure (callback.error) situation.
Note: The text record is the NFC Forum Well Known Type and is marked as "T" (in NFC binary encoding: 0x54).
The recordsToSend array can contain either contacts converted to String or messages converted to JSON with added ‘sms’ at the beginning in order to distinguish them from contacts.
Receiving NDEF message
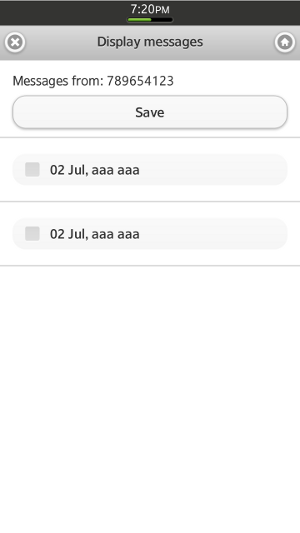 Figure 10: Page displaying received messages Figure 10: Page displaying received messages |
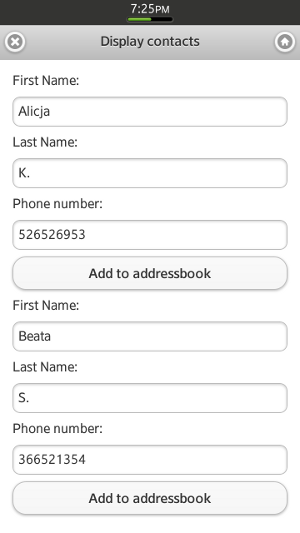 Figure 11: Page displaying received contacts Figure 11: Page displaying received contacts |
As written before, in case of receiving a message the onreceive() method is invoked:
onreceive: function(message) {
    if (message.records[0].text.substring(0, 3) === "sms")
        messageManager.handleMessageReceive(message);
    else
        contactsManager.handleContactReceive(message);
}
The function recognizes what the received message’s type (sms message or contact), and invokes the proper handler.
The handleMessageReceive() method reads every record of the NDEF message, decodes and adds it as an object to the records array, as follows:
    var records = [];

    // Read received data to 'records' array
    for (var i = 0; i < message.records.length; i++) {

        try {
            records[i] =
    jQuery.parseJSON(decodeURIComponent(message.records[i].text.slice(3)));
        } catch (e) {
            shareContacts.onError(e);
        }
    }
Method jQuery parseJSON() takes one parameter, JSON string and returns the Javascript object.
The method is responsible for setting the next displayed page, creating items of received (or searched) messages. Every item includes the receiving date and up to fourteen initial characters of the message. Elements of the list are registered to handle the “swipeleft” events. A “swipeleft” event opens a display-message page, where you can see the full body of the message.
If the received NDEF message contains contact data, the handleContactReceive() function is invoked. This method creates contacts from the received data and puts them into the receivedContacts global array. It also opens a new page and displays received contacts with the "Add to addressbook" option under each of them. You can add received contacts without any modification or modify them to fit your needs. How to create and add contacts to the address book is described later.
Messaging API
The Messaging API provides access to features such as retrieving available message services, sending SMS messages, searching for messages and managing them. To use any part of the Messaging API , you must declare the necessary features in the config.xml file (described earlier).
You can find more information about Messaging API here.
Finding message(s)
A message object allows storing information (such as the recipient, sender, subject, body, type, etc.) and allows applications to retrieve the content of a message through the MessageStorage methods.
In the sample application we search for messages received from a selected phone number (phrase). For this purpose, you should create the filter like this:
var fromFilter = new tizen.AttributeFilter("from", "EXACTLY", phrase);The created filter will be passed to the findMessages() method of a service object. To get a service object, please do the following:
tizen.messaging.getMessageServices('messaging.sms', function(
        services) {
    var fromFilter = new tizen.AttributeFilter("from", "EXACTLY",
            phrase);

    try {
        services[0].messageStorage.findMessages(fromFilter,
                callback.success, callback.error);
    } catch (e) {
        tlib.logger.err("Searching failed: " + e.name + ":"
                + e.message);
    }
}, shareContacts.onError);
getMessageServices() retrieves the messaging service of a given type for a given account. The method takes four parameters: the type of service to be retrieved (in this sample application, a SMS service object is obtained, so we use the “messaging.sms” type), success and error callbacks and serviceId (omitted in this sample application). The third and fourth parameters are optional.
When finding message services has been successfully completed, a success callback function returns an array of available MessageService objects (services) on the device. We assume that there is only one service returned. We use the service object to call the findMessages() method with the following parameters: fromFilter (described earlier), and success and error callbacks. The callback.success function invokes the messageManager.display() method (described earlier).
Saving message(s) in the ‘Drafts’ folder
Figure 10 shows a page displaying received messages. Each item on the list can be saved in the ‘Drafts’ folder after selecting it and clicking on the ‘Save’ button.
for ( var i = 0; i < checkedMessages.length; i++) {
    // Create message
    message = new tizen.Message("messaging.sms", {
        plainBody : displayedMesssages[checkedMessages[i]].body
    });

    // Save message in Drafts
    messages.addToDraft(message, callback);
}
checkedMessages is an array containing IDs of selected messages. displayedMessages is an array containing (in this case) received message objects. After clicking on the ‘Save’ button, the sample application uses bodies of selected messages (from displayed messages) to create a new Message object, which is used as the first parameter of the addToDraft() method. The addToDraft() method looks as follows:
addToDraft : function(message, callback) {
    tizen.messaging.getMessageServices('messaging.sms', function(
            services) {

        try {
            services[0].messageStorage.addDraftMessage(message,
                    callback.success, callback.error);
        } catch (e) {
            tlib.logger.err("Searching failed: " + e.name + ":"
                    + e.message);
        }
    }, shareContacts.onError);
}
The getMessageServices() method has been described in the previous chapter.
If finding message services is successful, a success callback function returns an array of available MessageService objects (services) to the device. We use the service object to call the addDraftMessage() method with the following parameters: message (described earlier), success and error callbacks. This method adds a draft message to MessageStorage. The received by the NFC message can be found in the Drafts folder.
Contact API
The tizen.contact object contains information such as phone numbers, e-mail addresses, etc. The Contact API provides functionality to read, create, remove, and update contacts in specific address books. To use any of the Contact functionality, you must declare the necessary features in the config.xml file (described earlier).
For more information about Contact API, please visit: Documentation and the Address Book Management article.
Convert contact to VCARD
Before you can get a contact, you need to get an instance of the AddressBook object. You can get the default address book using the following method:
var addressbook = tizen.contact.getDefaultAddressBook();
Once you have retrieved the default Address Book, you can get a contact instance.
for (var i = 0; i < contactsToSend.length; i++) {
    contactData = addressbook.get(contactsToSend[i]);
The contactsToSend array contains IDs of contacts that you select for sending.
You can now serialize the Contact item to string type using vCard 3.0 format.
try {
    textNDEF = contactData.convertToString("VCARD_30");
} catch (e) {
    tlib.logger.err('The following error occurred while converting: '
                    + e.name + ": " + e.message);
    return;
}
vCard 3.0 format is the only one supported by the Tizen platform. It contains information about contact that we want to export. Format for exchanging contacts defines RFC 2426 vCard MIME Directory Profile.
Creating and adding contacts
If the received NDEF message contains contact data, a new contact is created, which can be added to the address book later on.
Contact object can be created:
- using the string representation (of contact converted to string earlier) in the vCard 3.0 format, as follows:
var tmp = new tizen.Contact(contactData, "VCARD_30");
- by setting attributes of the Contact object, as follows:
var contact = new tizen.Contact({
    name : new tizen.ContactName({
        firstName : tmp.name.firstName,
        lastName : tmp.name.lastName
    }),
    phoneNumbers : [
               new tizen.ContactPhoneNumber(tmp.phoneNumbers[0].number) ]
});
We use both of the above approaches.
The sample application gives you the possibility to add the created contact to the phone address book. Clicking on the ‘Add to addressbook’ button invokes the function that checks if the phone number (of the contact we want to add) exists in the phone address book. If so, the relevant popup is displayed and you can decide if you want to duplicate this number. Otherwise, the contact is added in the following way:
add : function(contact) {
    try {
        addressbook.add(contact);
    } catch (e) {
        tlib.logger.err("Unable to add contact to address book: " + e.message);
        return false;
    }

    return true;
}
Getting an instance of the AddressBook object (addressbook) is described in the previous chapter. The add () method takes only one parameter: the contact to be added.
Filesystem API
The Tizen Filesystem API provides access to the device's file system. To use any features of the Filesystem object, you must declare the necessary features in the config.xml file (described earlier).
For more information about the Filesystem API, visit: Documentation.
The sample application uses the FileSystem API to resolve the directory path, create the file and/or write into it. Information about these operations can be found in the “Custom 2D Graphics on Tizen” article (‘Using the Filesystem Tizen Device API’ chapter).
Summary
From this article, you have learned:
- how to use the NFC API to detect connected devices, create NDEF records, create/send/receive NDEF messages,
- how to test the NFC functionality on the Tizen emulator,
- how to use the Event Injector,
- how to explore the file system on the emulator with use of the Connection Explorer view,
- how to find messages for the selected contact,
- how to save messages to the ‘Drafts’ folder,
- how to convert contact to a VCARD 3.0,
- how to create contacts,
- how to add contacts to the default address book.
We hope this article will help you to create Tizen web apps utilizing NFC functionality. Using NFC it’s very easy to sent short text data between two tightly coupled devices such as: URLs, geographic coordinates, etc.