Simple game using Crafty.js
PUBLISHED
Overview
This article demonstrates the usage of crafty js game engine for developing games. Crafty is a Javascript-based HTML5 game engine. It is designed to make simple games with 2D graphics easily. Before going to develop a game using crafty user has to know about two important things. They are
1. Entity
2. Component
Entity
An entity is any object that exists in the game world and has behaviour of any kind within it. In other words, everything user see on the screen in a Crafty game (not a background image) is probably an entity.
Component
A component specifies a set of data and/or behaviours that can be applied to one or more entities.
Building a game with Crafty
This game is a minimally-featured adventure-style game, where the goal is to run around and visit all the villages in a forest.
Prerequisites
Before starting to develop a game user has to download latest Crafty.js file. Next, download all the image and audio assets required from this archive here. Create a directory assets and move all the files in the downloaded "crafty_bng_tut_assets" directory into "assets" directory.
Intializing the game
First create a file game.js. The js/game.js file itself simply defines a globally-accessible Game object with a single function start, that initializes and starts the Crafty "game".
 Game = {

  // Initialize and start the game

  start: function() {

    // Start crafty and set background color

    Crafty.init(480, 320);
    Crafty.background('green');
  }
}
The HTML file, index.html simply imports the Crafty game library file "crafty.js", followed by game.js (which contains the code to set up unique Crafty game). Finally, a single line of Javascript tells the browser to run the "Game.start" function once the page is fully loaded.
<html>
<head>
 <script src="lib/crafty.js"></script>
 <script src="src/game.js"></script>
 <script>
    window.addEventListener('load', Game.start);
 </script>
</head>
<body>
</body>
</html>
Creating a simple forest Scene
Before creating a forest scene user has to know how to create a "grid" and "tiles" on which entities are placed. Now create some terrain by placing a tree at every edge square on the grid and then randomly placing bushes on squares in between the edges. Have a look at the code how to create a grid, trees and bushes
Game = {
  // This defines our grid's size and the size of each of its tiles
  map_grid: {
    width:  22,
    height: 33,
    tile: {
      width:  16,
      height: 16
    }
  },

  // The total width of the game screen. Since the grid takes up the entire screen this is just the width of a tile times the width of the grid

  width: function() {
    return this.map_grid.width * this.map_grid.tile.width;
  },

  // The total height of the game screen. Since the grid takes up the entire screen this is just the height of a tile times the height of the grid

  height: function() {
    return this.map_grid.height * this.map_grid.tile.height;
  },

  // Initialize and start the game

  start: function() {
    // Start crafty and set a background color so that we can see it's working
    Crafty.init(Game.width(), Game.height());
    Crafty.background('rgb(249, 223, 125)');

    // Place a tree at every edge square on our grid of 16x16 tiles

    for (var x = 0; x < Game.map_grid.width; x++) {
      for (var y = 0; y < Game.map_grid.height; y++) {
        var at_edge = x == 0 || x == Game.map_grid.width - 1 || y == 0 || y == Game.map_grid.height - 1;
        if (at_edge) {

          // Place a tree entity at the current tile

          Crafty.e('2D, Canvas, Color')
            .attr({
              x: x * Game.map_grid.tile.width,
              y: y * Game.map_grid.tile.height,
              w: Game.map_grid.tile.width,
              h: Game.map_grid.tile.height
            })
            .color('rgb(20, 125, 40)');
        }
        else if (Math.random() < 0.06) {

          // Place a bush entity at the current tile

          Crafty.e('2D, Canvas, Color')
            .attr({
              x: x * Game.map_grid.tile.width,
              y: y * Game.map_grid.tile.height,
              w: Game.map_grid.tile.width,
              h: Game.map_grid.tile.height
            })
            .color('rgb(20, 185, 40)');
        }
      }
    }
  }
}
In the above code "Crafty.e('2D, Canvas, Color')" creates a new entity that uses three components: "2D", "Canvas", and "Color". The 2D component allows user to set an x and y position (cartesian coordinates) for the entity as well as a height and width for the object. The Canvas component causes the entity to be drawn on the Canvas DOM element that displays the game. The Color component allows user to set the color for the entity.
Reusing common properties and behaviour through "Components"
In the above code a "Tree" and "Bush" has created. If user wants multiple trees and bushes to place in the "forest scene", it is difficult to create. So create our own components that multiple entities can reuse. For this create component.js file and place all the components created. In addition to 'Tree' and 'Bush' create another component 'Actor'. An "Actor" will be a component that encapsulates the use of the 2D, Canvas, and Grid components. Have a look at the code to create reusable components
//Component.js

// The Grid component allows an element to be located on a grid of tiles

Crafty.c('Grid', {
  init: function() {
    this.attr({
      w: Game.map_grid.tile.width,
      h: Game.map_grid.tile.height
    })
  },

  // Locate this entity at the given position on the grid

  at: function(x, y) {
    if (x === undefined && y === undefined) {
      return { x: this.x/Game.map_grid.tile.width, y: this.y/Game.map_grid.tile.height }
    } else {
      this.attr({ x: x * Game.map_grid.tile.width, y: y * Game.map_grid.tile.height });
      return this;
    }
  }
});

// An "Actor" is an entity that is drawn in 2D on canvas via our logical coordinate grid

Crafty.c('Actor', {
  init: function() {
    this.requires('2D, Canvas, Grid');
  },
});

// A Tree is just an Actor with a certain color
Crafty.c('Tree', {
  init: function() {
    this.requires('Actor, Color')
      .color('rgb(20, 125, 40)');
  },
});

// A Bush is just an Actor with a certain color
Crafty.c('Bush', {
  init: function() {
    this.requires('Actor, Color')
      .color('rgb(20, 185, 40)');
  },
});
Now game.js file is now much simpler because instead of defining all the properties of each entity inline, it simply references the components just created. Take a look at simplified game.js file
Game = {
// This defines our grid's size and the size of each of its tiles

  map_grid: {
    width:  24,
    height: 16,
    tile: {
      width:  16,
      height: 16
    }
  },

  // The total width of the game screen. Since our grid takes up the entire screen this is just the width of a tile times the width of the grid

  width: function() {
    return this.map_grid.width * this.map_grid.tile.width;
  },

  // The total height of the game screen. Since our grid takes up the entire screen this is just the height of a tile times the height of the grid

  height: function() {
    return this.map_grid.height * this.map_grid.tile.height;
  },

  // Initialize and start our game

  start: function() {
    // Start crafty and set a background color so that we can see it's working
    Crafty.init(Game.width(), Game.height());
    Crafty.background('rgb(249, 223, 125)');

    // Place a tree at every edge square on our grid of 16x16 tiles

    for (var x = 0; x < Game.map_grid.width; x++) {
      for (var y = 0; y < Game.map_grid.height; y++) {
        var at_edge = x == 0 || x == Game.map_grid.width - 1 || y == 0 || y == Game.map_grid.height - 1;

        if (at_edge) {

          // Place a tree entity at the current tile

          Crafty.e('Tree').at(x, y);
        }
        else if (Math.random() < 0.06) {

          // Place a bush entity at the current tile

          Crafty.e('Bush').at(x, y);
        }
      }
    }
  }
}
Now the screen looks like this
Adding a player to the screen
Add an entity that the player can control. To do this, define a new component named PlayerCharacter (PC for short). The PC component will require the Actor, MoveTo, and Color components. Actor and Color components have already used in the above code but MoveTo is new. MoveTo allows player to move on the screen using "Mouse or Touch events". To activate this "MoveTo" control scheme for player character entity add the "MoveTo" component to it and then call the moveTo() function on the entity to set the speed at which it should move. The downloaded crafty.js file doesn't have 'moveTo' function. So copy the code from here and add it at the end of crafty.js file.
Add the below code in Component.js file
// This is the player-controlled character

Crafty.c('PlayerCharacter', {
  init: function() {
    this.requires('Actor, MoveTo, Color')
      .moveTo(4)
      .color('rgb(20, 75, 40)');
  }
});
Now add the below code in game.js file
Game = {
  // Initialize and start our game

start: function() {
    // Start crafty and set a background color so that we can see it's working...

    // Player character, placed at 5, 5 on our grid

    Crafty.e('PlayerCharacter').at(5, 5);

    // Place a tree at every edge square on our grid of 16x16 tiles
    //...
  }
}
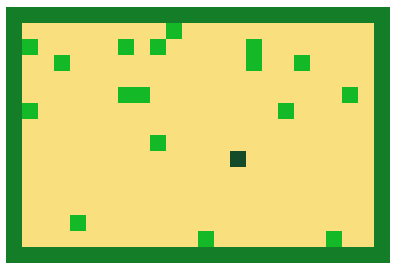
Now the screen looks like this
Adding villages to be visited
The game now consists of a player character that can move around between trees and bushes. Let's add some interactivity by giving the player something to do while he move around. Add "villages" that the player can visit as he move around the screen. Adding villages also takes just three additions to the code. First, define a new component named Village and give it a unique color so that they stand out on the game board. Second, register a callback function that will handle the "visiting" of a village each time the player encounters one. Finally, add some code to the game startup sequence to spawn some initial villages in random locations. Here are the additions to the code needed:
Component.js
// This is the player-controlled character

Crafty.c('PlayerCharacter', {
  init: function() {
    this.requires('Actor, MoveTo, Color, Collision')
      .moveTo(4)
      .color('rgb(20, 75, 40)')

      // Whenever the PC touches a village, respond to the event
      .onHit('Village', this.visitVillage);
  },

  // Respond to this player visiting a village

  visitVillage: function(data) {
    villlage = data[0].obj;
    villlage.collect();
  }
});

// A village is a tile on the grid that the PC must visit in order to win the game

Crafty.c('Village', {
  init: function() {
    this.requires('Actor, Color')
      .color('rgb(170, 125, 40)');
  },

  collect: function() {
    this.destroy();
  }
});
Game.js
Game = {
  // ...
  // Initialize and start our game

  start: function() {
    // ...
    // Generate up to five villages on the map in random locations

    var max_villages = 5;
    for (var x = 0; x < Game.map_grid.width; x++) {
      for (var y = 0; y < Game.map_grid.height; y++) {
        if (Math.random() < 0.02) {
          Crafty.e('Village').at(x, y);

          if (Crafty('Village').length >= max_villages) {
            return;
          }
        }
      }
    }
  }
}
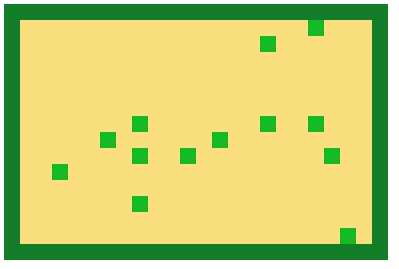
Now the screen looks like this

Creating a victory screen
Now add a goal for the player to accomplish and a victory screen to greet him at the end when he succeed at his goal. To this end, track the number of villages the player has visited and show a victory screen saying "Victory!" when he visit the last one. To achieve this use Crafty's useful built-in concept "scenes". Scenes are a way of differentiating distinct parts of the game from one another. For this game, start with two scenes: the "Game" scene which runs the game user has been playing all along and the "Victory" screen which tells the player that he has won. Since scenes are such an important part of code organization, make a new file 'js/scenes.js' to define these scenes. For "Loading" screen just display a simple message in text using a new entity with the 2D, DOM, and Text components. These three built-in components make it easy to draw text for game using standard DOM + CSS browser technology. The only other thing the Victory screen does is showing the user that he has acheived his goal. Here are the additions to the code
Scenes.js
Crafty.scene('Game', function() {

  // A 2D array to keep track of all occupied tiles

  this.occupied = new Array(Game.map_grid.width);
  for (var i = 0; i < Game.map_grid.width; i++) {
    this.occupied[i] = new Array(Game.map_grid.height);
    for (var y = 0; y < Game.map_grid.height; y++) {
      this.occupied[i][y] = false;
    }
  }

  // Player character, placed at 5, 5 on our grid

  this.player = Crafty.e('PlayerCharacter').at(5, 5);
  this.occupied[this.player.at().x][this.player.at().y] = true;

  // Place a tree at every edge square on our grid of 16x16 tiles

  for (var x = 0; x < Game.map_grid.width; x++) {
    for (var y = 0; y < Game.map_grid.height; y++) {
      var at_edge = x == 0 || x == Game.map_grid.width - 1 || y == 0 || y == Game.map_grid.height - 1;

      if (at_edge) {
        // Place a tree entity at the current tile
        Crafty.e('Tree').at(x, y);
        this.occupied[x][y] = true;
      }
      else if (Math.random() < 0.06 && !this.occupied[x][y]) {

        // Place a bush entity at the current tile

        Crafty.e('Bush').at(x, y);
        this.occupied[x][y] = true;
      }
    }
  }

  // Generate up to five villages on the map in random locations

  var max_villages = 5;
  for (var x = 0; x < Game.map_grid.width; x++) {
    for (var y = 0; y < Game.map_grid.height; y++) {
      if (Math.random() < 0.02) {
        if (Crafty('Village').length < max_villages && !this.occupied[x][y]) {
          Crafty.e('Village').at(x, y);
        }
      }
    }
  }

  this.show_victory = this.bind('VillageVisited', function() {
    if (!Crafty('Village').length) {
      Crafty.scene('Victory');
    }
  });
}, function() {
  this.unbind('VillageVisited', this.show_victory);
});

Crafty.scene('Victory', function() {
  Crafty.e('2D, DOM, Text')
    .attr({ x: 0, y: 0 })
    .text('Victory!');
},
Game.js
Game = {
  // ...
  // Initialize and start our game

  start: function() {
    // Start crafty and set a background color so that we can see it's working
    Crafty.init(Game.width(), Game.height());
    Crafty.background('rgb(249, 223, 125)');

    // Simply start the "Game" scene to get things going

    Crafty.scene('Game');
  }
}
Adding rich graphics Using 'sprites' and making animations
A "sprite" is a 2D image representing a single visual element such as a tree or bush. A sprite map is a bitmapped image that contains multiple sprites. Crafty makes it very easy to map sprites from a spite map to components and entities. To start, load the sprite map image via Crafty.load. Then call Crafty.sprite and pass in the width (in pixels) of each sprite in the sprite map, the path to the asset, and object defining what each sprite will be called, then the horizontal and then vertical padding between each sprite in the sprite map. For more information on how to create "sprites" refer the link. Add the below code in Scene.js file
// Handles the loading of binary assets such as images and audio files
Crafty.scene('Loading', function(){

  // Draw some text for the player to see in case the file takes a noticeable amount of time to load
  Crafty.e('2D, DOM, Text')
    .text('Loading...')
    .attr({ x: 0, y: Game.height()/2 - 24, w: Game.width() })
    .css($text_css);

  // Load our sprite map image

  Crafty.load(['assets/16x16_forest_1.gif'],'assets/village1.jpg', function(){

    // Once the image is loaded, define the individual sprites in the image each one (spr_tree, etc.) becomes a component these components' names are prefixed with "spr_" to remind us that they simply cause the entity to be drawn with a certain sprite

    Crafty.sprite(16, 'assets/16x16_forest_1.gif', {
      spr_tree:    [0, 0],
      spr_bush:    [1, 0],
      spr_player:  [1, 1]
    });

    Crafty.sprite(8,'assets/village1.jpg',{
    spr_Village:[1.2,6.3,3.5,4]
    });

    // Now that our sprites are ready to draw, start the game

    Crafty.scene('Game');
  })
Modify the component.js file as shown below to add sprites
// A Tree is just an Actor with a certain sprite

Crafty.c('Tree', {
  init: function() {
    this.requires('Actor, Solid, spr_tree');
  },
});

// A Bush is just an Actor with a certain sprite

Crafty.c('Bush', {
  init: function() {
    this.requires('Actor, Solid, spr_bush');
  },
});

// This is the player-controlled character

Crafty.c('PlayerCharacter', {
  init: function() {
    this.requires('Actor, MoveTo, Collision, spr_player')
      .moveTo(4)
      .onHit('Village', this.visitVillage)

      //These next lines define our four animations each call to .animate specifies the name of the animation the x and y coordinates within the sprite map at which the animation set begins the number of animation frames *in addition to* the first one
      .animate('PlayerMovingUp',    0, 0, 2)
      .animate('PlayerMovingRight', 0, 1, 2)
      .animate('PlayerMovingDown',  0, 2, 2)
      .animate('PlayerMovingLeft',  0, 3, 2);

  // Watch for a change of direction and switch animations accordingly

    var animation_speed = 8;
    this.bind('NewDirection', function(data) {
      if (data.x > 0) {
        this.animate('PlayerMovingRight', animation_speed, -1);
      } else if (data.x < 0) {
        this.animate('PlayerMovingLeft', animation_speed, -1);
      } else if (data.y > 0) {
        this.animate('PlayerMovingDown', animation_speed, -1);
      } else if (data.y < 0) {
        this.animate('PlayerMovingUp', animation_speed, -1);
      } else {
        this.stop();
      }
    });
  },

  },
  // Respond to this player visiting a village
  visitVillage: function(data) {
    villlage = data[0].obj;
    villlage.visit();
  }
});

// A village is a tile on the grid that the PC must visit in order to win the game

Crafty.c('Village', {
  init: function() {
    this.requires('Actor, spr_village');
  },

  // Process a visitation with this village

  visit: function() {
    this.destroy();
    Crafty.trigger('VillageVisited', this);
  }
});
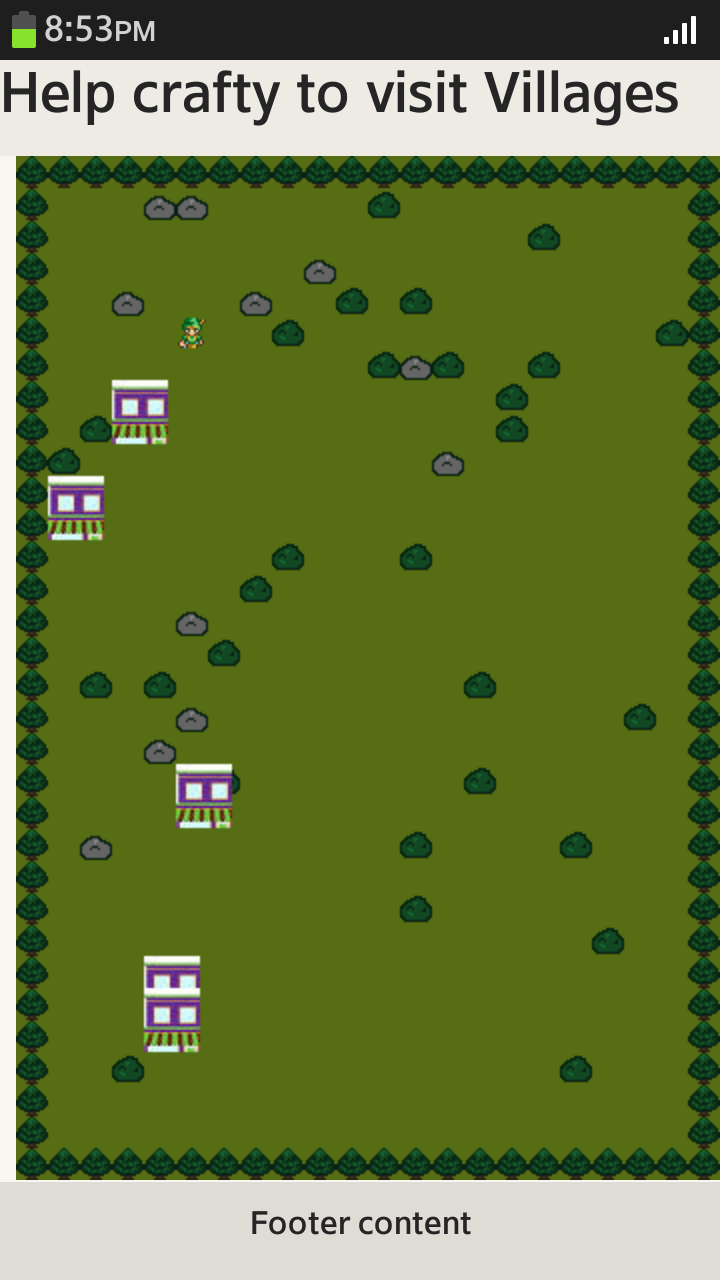
Now the final screen looks like this