Managing Pages: Creating and Routing a Page
The basic building block of an application UI in the TAU library is the Page element, which includes all other elements. The element is optional and extendable, so you can have any element for grouping controls you want.
Page Structure
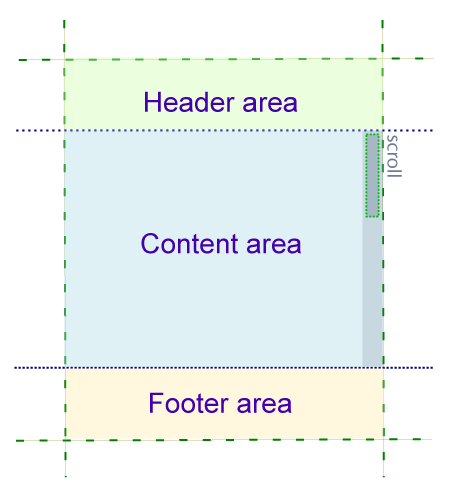
The page consist of:
- Header area
Shows the user which page is currently open. The header can contain buttons, menus, and toolbars. The header is optional.
- Content area
Contains the main application content. The content area has an optional scroll bar.
- Footer area
Contains a status line or buttons. The footer is optional.
All the page areas are specified by a corresponding class attribute.
Figure: Page content

If there is no Page element in the markup, TAU creates one. For example, if no Page element exists:
<span>I have no page</span>
TAU creates a page:
<div class="ui-page"><span>I have no page</span></div>
Creating a Single Page
To create a page:
-
Create a single page with the following code:
<div class="ui-page">
   Simple page
</div>
To create a page for your application, use the class attribute with the ui-page value. TAU uses that information to properly acquire the div element and bind the DOM element to its JavaScript component implementation.
-
Create a header area by using the class="ui-header" attribute:
<div class="ui-page">
   <div class="ui-header">This is a header</div>
</div>
-
Create a footer area by using the class="ui-footer" attribute:
<div class="ui-page">
   <div class="ui-footer">This is a footer</div>
</div>
-
Create the main content area by using the class="ui-content" attribute:
<div class="ui-page">
   <div class="ui-header">MyApplication header</div>
   <div class="ui-content">
      Hello world!
   </div>
   <div class="ui-footer">Application status line</div>
</div>
The previous example shows a full page structure. The header and footer areas can contain multiple UI components, such as buttons or images.
The following example shows a title bar with a More Options button and an icon:
<div class="ui-page">
   <div class="ui-header">
      <h2 class="ui-title ui-icon" style="background-image: url(image.png);">Title</h2>
      <button type="button" class="ui-more ui-icon-overflow">More Options</button>
   </div>
   <div class="ui-content">MyApplication content</div>
</div>
-
You can also create a popup for your page:
<div class="ui-page">
   <div class="ui-header">Popup Open Page</div>
   <div class="ui-content">
      <a href="#popup" class="ui-btn" data-rel="popup">Popup Open</a>
   </div>

   <div id="popup" class="ui-popup">
      <div class="ui-popup-header">Popup Page</div>
      <div class="ui-popup-content">Popup Content</div>
   </div>
</div>
The popup works because TAU opens (makes visible) the page whose id attribute corresponds to the #hashtag page. This is basic page routing; for more information, see Page Routing.
Creating Multiple Pages in One HTML Code
You can implement a template containing multiple page containers in the application's index.html file.
In a multi-page layout, the main page is defined with the ui-page-active class. If no page has the ui-page-active class, the framework automatically sets up the first page in the source order as the main page. You can improve the launch performance by explicitly defining the main page to be displayed first. If the application has to wait for the framework to set up the main page, the page is displayed with some delay only after the framework is fully loaded.
<body>
   <div class="ui-page ui-page-active" id="first">
      <div class="ui-content">
         <!--CONTENT-->
      </div>
   </div>

   <div class="ui-page" id="two">
      <div class="ui-content">
         <!--CONTENT-->
      </div>
   </div>
</body>
Page Routing
TAU is basically a UI framework, but since its purpose is to ease application building, it also provides basic functionality for changing pages in multi-page applications. The mechanics behind page routing are simple, and work without any additional JavaScript code. You can use the JavaScript API to get more powerful page routing functionalities.
To manage page routing:
- To route without JavaScript:
TAU routing is based on URL hash changes, and it has a built-in mechanism for history tracking. The framework responds to #hashtag changes and tries to display the page that has the id attribute equal to the hashtag value. This approach works for pages defined inside the same HTML document.
TAU uses every <a> element in the page and binds routing methods for them. In addition, all button instances that are based on that tag and have a proper href attribute work with the framework router. The active page has a ui-page-active class assigned. Set that class yourself to be sure the correct page is displayed.
<!--pageOne.html-->
<div class="ui-page ui-page-active" id="first">
   <div class="ui-content">
      <a href="pageTwo.html">Go to page two</a>
   </div>
</div>

<!--pageTwo.html-->
<div class="ui-page" id="two">
   <div class="ui-content">
      <a href="pageOne.html">Go to page one</a>
   </div>
</div>
With multiple pages in one HTML code, you can use only the ID of the page in the href attribute:
<div class="ui-page ui-page-active" id="first">
   <div class="ui-content">
      <a href="#two">Go to page two</a>
   </div>
</div>

<div class="ui-page" id="two">
   <div class="ui-content">
      <a href="#first">Go to page one</a>
   </div>
</div>
- To route using the API:
You can change pages through the TAU API by using the tau.changePage() method:
<!--pageTwo.html-->
<div class="ui-page ui-page-active" id="first">
   <div class="ui-content">
      You are viewing the first page of the example.
      <button id="first-button">Click here to change to page two</button>
   </div>
   <script>
      var el1 = document.getElementById("first-button");
      el1.addEventListener("click", function ()
      {
         tau.changePage("pageTwo.html");
      });
   </script>
</div>

<!--pageTwo.html-->
<div class="ui-page" id="second">
   <div class="ui-content">
      This is the second page of the example.
      <button id="second-button">Click here to change to page one</button>
   </div>
   <script>
      var el2 = document.getElementById("second-button");
      el2.addEventListener("click", function ()
      {
         tau.changePage("pageOne.html");
      });
   </script>
</div>
- To load pages from external resources:
When an external page is supplied to the routing engine, TAU fetches that page and appends it to the current document, while changing the base element's href attribute to that page path. This ensures that all other resources, such as CSS, JS, or images, are loaded from the correct path without no real page reloads. Instead, TAU simply switches the current page to the new page.
To load pages from external resources, define the proper local address in the href attribute of the link:
<div class="ui-page">
   <div class="ui-content">
      <a href="external_text.html">Change to external</a>
   </div>
</div>
To create an external link that is not supposed to be handled by the TAU router, use the rel="external", data-ajax="false", or target="_self" attribute:
<div class="ui-page">
   <div class="ui-content">
      <a href="external_text.html" target="_self">Change to external</a>
   </div>
</div>


