Rendering and Effects: Managing Viewing Modes and Shader Effects
DALi provides stereoscopic viewing modes. It also provides a way to use user-defined custom shader effects.
Viewing Modes
DALi supports the following viewing modes:
- MONO
- STEREO_HORIZONTAL
- STEREO_VERTICAL
MONO is the default viewing mode. When using the MONO mode, only 1 image per scene is produced in every update. In this setup, DALi creates a default render task, which renders everything added to the stage root layer, and 1 default camera for that render task.
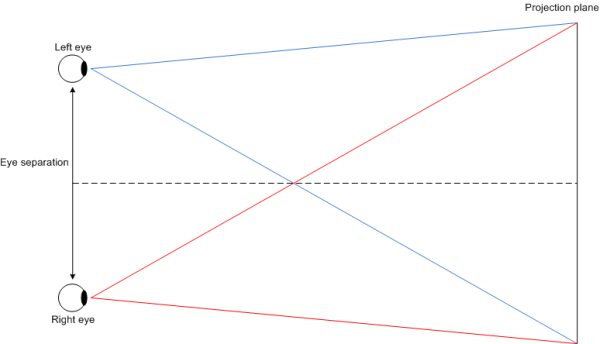
The STEREO_HORIZONTAL and STEREO_VERTICAL modes allow the application to produce stereo images. Stereoscopy is a technique for creating or enhancing the illusion of depth in an image. Stereo rendering technique produces 2 images of the scene with an slight offset between them, which is presented to the left and the right eye independently. In this setup, DALi creates 2 additional render tasks, 1 for the right eye and 1 for the left, each with its own camera. Those cameras are parented to the default camera. The method to generate the projection transformation for each camera is known as "parallel axis asymmetric frustum perspective projection" and is illustrated in the following figure.
Figure: Stereoscopic projection

The separation between the 2 cameras is configurable but, typically, it ranges between 50 and 70 millimeters. Too large a separation can be hard to resolve and is known as hyperstereo. The convergence plane for both frustums is the 2D plane, so the projection of anything lying in the 2D plane is coincident for both left and right eye, resulting in no parallax. Objects that lie in front of the projection plane appear to be in front of the screen and objects behind the projection plane appear to be "into" the screen. Objects behind the projection plane (positive parallax) are easier to look at without straining the eyes.
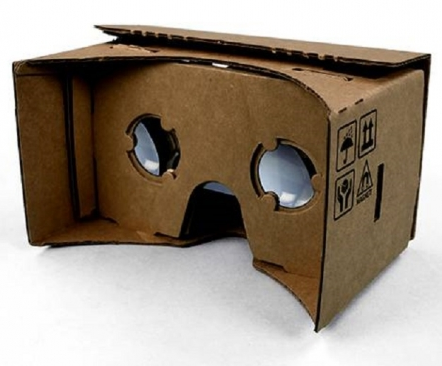
To view stereoscopic images correctly, each image must be presented to each eye independently. There are devices on the market for this, such as a head-mounted display, which is a display device worn in the head that has 2 small displays, one for each eye. A cheaper alternative to this often expensive device is the Google cardboard viewer.
Figure: Google cardboard viewer

With the Google cardboard viewer or a similar device, you can transform your phone into a basic virtual reality headset.
Stereoscopic Rendering in DALi
The STEREO_HORIZONTAL mode presents the left image on the top half of the screen and the right image on the bottom half. It is intended to be used in landscape orientation, so the images are rotated 90 degrees counter-clockwise. The STEREO_VERTICAL mode, on the other hand, renders the left image on the left half of the screen and the right image on the right half.
To define the viewing mode to be used, use the SetViewMode() function of the Application class, passing the mode as a parameter. You can query the view mode being used by calling the GetViewMode() function. To define the separation between the left and right cameras, use the SetStereoBase() function, passing the distance in millimeters as a parameter. This distance can be queried using the GetStereoBase() function. You can also set the viewing mode and offset at initialization time using 2 command line arguments for this purpose: -view-mode (or -v) and 0 for MONO, 1 for STEREO_HORIZONTAL, 2 for STEREO_VERTICAL, and -stereo-base (or -s) and the separation in millimeters.
Restrictions
There are certain restrictions when writing stereoscopic applications using DALi:
- When a stereo mode is selected, the default render task source actor is set to an uninitialized actor so it does not render anything. Changing the default render task source actor later on produces undesired results, as the user does not want to see anything rendered by the default camera when stereo mode is on.
- Stereo cameras are parented to the default camera, so if the application needs to change the camera position or orientation, it must change the default camera transformation. The handle to the default camera can be obtained from the default render task as follows:
Dali::RenderTask defaultRenderTask = Dali::Stage::GetCurrent().GetRenderTaskList().GetTask( 0 );
Dali::CameraActor defaultCamera = defaultRenderTask.GetCameraActor();
- Stereo render tasks render everything added to the stage's root layer. If the application must render an object hierarchy to an off-screen buffer, it must set the exclusive flag on that render task so that the stereo tasks do not render that particular subtree. To set the exclusive flag in a render task, use the SetExclusive() function defined in the render task.
| Note |
|---|
| DALi stereoscopic viewing mode is still under development, and may not be mature enough for commercialized applications at the moment. For example, distortion correction is not supported yet. Tizen continues to improve the stereoscopic mode to give you a chance to provide more exciting and immersive user experience to your customers. |
Shader Effects
The shader effects allow the developer to apply visual deformations on the actors. They can affect the geometry, the colors and textures of the actor.
- Each actor has its own default shaders.
- Those default shaders can be overridden by modified shader effects.
- In an application, each actor might possess its own shader effect.
- In an application, multiple actors might apply the same effect.
Custom Shader Effects
The Dali::ShaderEffect enables you to create custom shader effects by specifying the vertex and fragment shaders. For a custom shader, you can provide the vertex and fragment shader code as strings. These shader snippets get concatenated with the default attributes and uniforms. For animating a shader effect, see Shader Effect Animation.
The following example shows a simple custom shader effect:
// This sample code is for the HelloWorldExample class
// in Creating a DALi Application

// Simple vertex shader code
const char* SIMPLE_ANIMATE_VERTEX_SHADER = DALI_COMPOSE_SHADER(
  uniform float uOffset;
  void main()
  {
    vec4 pos = uProjection * uModelView * vec4( aPosition, 1.0);
    gl_Position = vec4( pos.x + uOffset, pos.y, pos.zw );
    vTexCoord = aTexCoord;
  } );

void HelloWorldExample::Create( Application& application )
{
  // Create an ImageActor
  ImageActor imageActor = ImageActor::New( ResourceImage::New( MY_IMAGE_PATH ) );
  Stage::GetCurrent().Add( imageActor );

  // Create a ShaderEffect; use the default pixel shader
  ShaderEffect shaderEffect =  ShaderEffect::New( SIMPLE_ANIMATE_VERTEX_SHADER, "" );
  imageActor.SetShaderEffect( shaderEffect );

  // Set the uniform value
  shaderEffect.SetUniform( "uOffset", 100.0f );
}
| Note |
|---|
| This sample code uses the Dali::ImageActor class (in mobile and wearable applications), which is discouraged due to its poor performance and design. Avoid using the ImageActor class unless you must apply shader effects. For general purposes, use the Dali::Toolkit::ImageView class (in mobile and wearable applications), which has much better performance. The ImageView class is supposed to support shader effects in the near future. |


