Task: Piano
This task, based on the Piano sample delivered with the Tizen SDK, demonstrates how you can use the HTML5 audio element API to create a piano application and play sounds. For more information on the sample functionality and creating the sample with the full source code, see Piano.
This task consists of the following parts:
- Defining the Application Layout defines how to create the application screens.
- Initializing the Application defines how to initialize the application.
- Handling the Keys defines how to create the piano object.
- Playing Sounds defines how to use the audio element to play sounds.
This sample is a fully functional application for playing a piano. The user can use multi-touch to play a combination of sounds from a single octave.
Defining the Application Layout
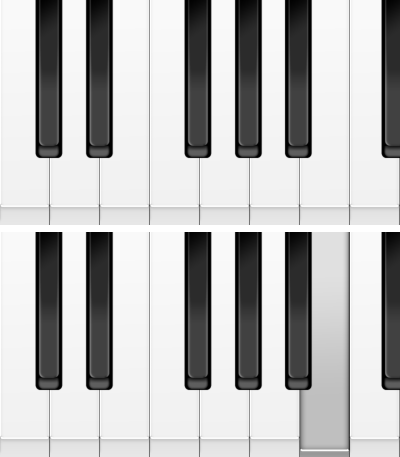
The Piano sample application layout contains only 1 screen: the main screen that displays the piano keyboard.
The following figure shows the main screen of the application.
Figure: Piano screen

Defining the Main Screen
- index.html Source File
The main screen displays a piano keyboard. The keys are defined as <div> elements whose class attribute is set to button.
<body ondragstart="return false" onselectstart="return false">

   <div class="button white_btn" id="play0"></div>
   <div class="button white_btn" id="play2"></div>
   <div class="button white_btn" id="play4"></div>
   <div class="button white_btn" id="play5"></div>
   <div class="button white_btn" id="play7"></div>
   <div class="button white_btn" id="play9"></div>
   <div class="button white_btn" id="play11"></div>
   <div class="button white_btn" id="play12"></div>

   <div class="button black_btn" style="left: 8.6%" id="play1"></div>
   <div class="button black_btn" style="left: 21.2%" id="play3"></div>
   <div class="button black_btn" style="left: 45.8%" id="play6"></div>
   <div class="button black_btn" style="left: 58.4%" id="play8"></div>
   <div class="button black_btn" style="left: 70.9%" id="play10"></div>
   <div class="button black_btn" style="left: 95%" id="play13"></div>

</body>
- style.css Source File
The appearance of the key buttons is defined in the CSS file.
.white_btn
{
   background: url('../white.png') bottom center no-repeat transparent;
   height: 100%;
   display: inline-block;
   background-size: 100%;
   width: 12.5%;
   height: 100%;
   position: relative;
   float: left;
   margin: 0;
   padding: 0;
   display: block;
   margin: 0;
}

.white_btn.pressed
   {
   background-image: url('../white_pressed.png');
}

.black_btn
   {
   float: left;
   background: url('../black.png')  bottom center no-repeat transparent;
   width: 7.6%;
   height: 73.8%;
   background-size: 100%;
   background-position: top center;
   position: fixed;
   top: 0px;
}

.black_btn.pressed
{
   background-image: url('../black_pressed.png');
}
Initializing the Application
- main.js Source File
-
The piano variable is declared to create the Piano object. A keyword is determined for optimizing browser performance and validating JavaScript. Elements are defined for storing the piano key element object IDs and corresponding audio elements.
var piano; function Piano() { "use strict"; } function() { "use strict"; Piano.prototype = { touchPianoKey: [], lockIds: {}, audio: [], whiteCache: null, blackCache: null } }; -
The audioInit() method is used to create and initialize the audio element for each keyboard button. The element contains an event listener to detect button events.
Piano.prototype.audioInit = function audioInit()
{
   var i, self = this;
   for (i = 0; i <= 13; i += 1)
   {
      this.audio[i] = document.createElement('audio');
      this.audio[i].name = i;
      this.audio[i].src = this.audio[i].name + ".wav";
      this.audio[i].addEventListener("playing", function()
      {
         self.lockIds["play" + this.name] = false;
      });
   }
};
-
Handling the Keys
The event handling functionality is implemented in the main.js file.
- Creating Event Listeners
-
The onPianoKeyTouchDown() event listener is created to detect the touch event, when the user presses a piano key.
Piano.prototype.onPianoKeyTouchDown = function onPianoKeyTouchDown(data) { data.originalEvent.preventDefault(); var element, touch, i, len; for (i = 0, len = data.originalEvent.changedTouches.length; i < len; i += 1) { touch = data.originalEvent.changedTouches[i]; element = document.elementFromPoint(touch.clientX, touch.clientY); if (element) { if (this.touchPianoKey[touch.identifier] !== element.id) { $('#' + this.touchPianoKey[touch.identifier]).removeClass('pressed'); this.playAudioByElement(element, touch.identifier, function() { this.lockIds[element.id] = true; }); } } } }; -
The onPianoKeyTouchUp() event listener is created to detect the touch event, when the user releases a piano key.
Piano.prototype.onPianoKeyTouchUp = function onPianoKeyTouchUp(data)
{
   var i, touchId, len, buttonId;
   for (i = 0, len = data.originalEvent.changedTouches.length; i < len; i += 1)
   {
      /* Get the number assigned to the finger touching the screen */
      touchId = data.originalEvent.changedTouches[i].identifier;
      buttonId = this.touchPianoKey[touchId];
      setTimeout(function()
      {
         (function(id)
         {
            $('#' + id).removeClass('pressed');
         })
         (buttonId);
      }, 100);
      this.touchPianoKey[touchId] = undefined;
   }
};
-
- Binding Events
The bindEvents() method is used to register event handlers to the corresponding events.
Piano.prototype.bindEvents = function bindEvents()
{
   var self = this;

   $(".button").bind('touchstart touchmove', function(e)
   {
      self.onPianoKeyTouchDown(e);
   });
   $(".button").bind('touchend', function(e)
   {
      self.onPianoKeyTouchUp(e);
   });
   $('#back').bind('touchstart', function(event)
   {
      event.preventDefault();
      event.stopPropagation();
      /* Apply CSS style dynamically */
      $(this).addClass('active');
      tizen.application.getCurrentApplication().exit();
   });

   $('#back').bind('touchend', function(event)
   {
      /* Cancel the applied CSS style */
      $(this).removeClass('active');
   });

   document.addEventListener('webkitvisibilitychange', function()
   {
      if (document.webkitVisibilityState === 'visible')
      {
         self.audioInit()
      }
   })
};
Playing Sounds
This section builds upon the elements described in Playing Media Files.
- main.js Source File
The playAudioByElement() method is used to play the sound determined in the audio element, when a given key button is pressed.
Piano.prototype.playAudioByElement = function playAudioByElement(element, touchId, callback)
{
   var audio = this.audio[element.id.substr(4)];
   $(element).addClass('pressed');
   this.touchPianoKey[touchId] = element.id;
   if (audio)
   {
      if (audio.paused)
      {
         audio.play();
      }
      if (audio.currentTime !== 0)
      {
         audio.currentTime = 0;
      }
      if (callback instanceof Function)
      {
         callback.call(this);
      }
   }
};

