
Task: Contacts Exchanger
This task, based on the ContactsExchanger sample delivered with the Tizen SDK, demonstrates how you can use the NFC API to exchange contacts between devices. For more information on the sample functionality and creating the sample with the full source code, see ContactsExchanger.
This task consists of the following parts:
- Defining the Application Layout defines how to create the application screens.
- Initializing the Application defines how to initialize the application.
- Setting up the NFC Connection defines how to set up and manage the NFC connection.
- Exchanging Contact Information with Tags defines how to receive a contact as an NDEF message, prepare the message, and save the contact on the SIM card using the Contact API.
- Exchanging Contact Information with Peers defines how to exchange messages between devices.
This sample is a fully functional application for exchanging between devices contact information based on contacts on a SIM card.
Defining the Application Layout
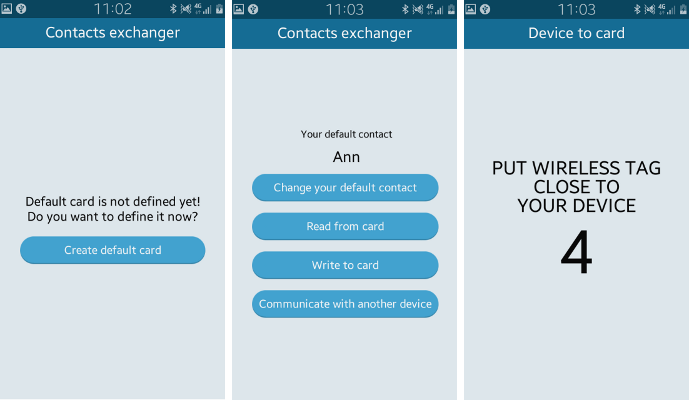
The ContactsExchanger sample application layout consists of 4 screens: the main screen displays the default contact and the operation buttons, the Contacts list screen displays a list of contacts, the Add contact screen allows the user to add a new contact, and the transfer screen is displayed when the user clicks an operation button on the main screen.
The following figure shows the main screens of the application.
Figure: ContactsExchanger screens
Defining the Main Screen
- index.html Source File
-
The header section of the screen is defined within a <div> element whose data-role attribute is set to header. The header section determines the title of the screen.
<!--Main screen layout-->
<div data-role="page" id="main">
   <!--Header section-->
   <div data-role="header" id="header-start">
      <h1>Contacts exchanger</h1>
   </div>
-
The main screen content is dynamic and created during the runtime.
   <!--Content section-->
   <div data-role="content" id="content-start">
      <!--Dynamic content-->
   </div>
</div>
-
- app.ui.js Source File
-
The loadStartPage() method is called to start the screen initialization. The method handles 2 scenarios: if the user has defined the default contact, the loadStartContent() method is executed, and the user gets access to the application. Otherwise, the user is prompted to define the default contact.
loadStartPage: function ui_loadStartPage() { if (localStorage.started === undefined) { this.loadTemporaryContent(); } else { this.loadStartContent(); } } -
If the default contact card is not defined, the content section of the screen displays a message and a button (in mobile or wearable applications) allowing user to create the default card.
<div class="box" id="temporaryBox">
   <p class="defaultText">Default card is not defined yet!<br>Do you want to define it now?</p>
   <div data-role="button" class="ui-btn-create">Create default card</div>
</div>
-
When the default card is defined and the default contact is selected, the main screen displays information about the default contact, and the operation buttons for changing the default contact, reading from or writing to the card, and communicating with another device.
<div class="box" id="startBox">
   <div id="comment">
      <p class="comment">Your default contact</p>
      <p class="comment" id="comment-name"></p>
      <p class="comment" id="comment-phone"></p>
   </div>
   <div data-role="button" class="ui-btn-create">
      Change your default contact
   </div>
   <div class="gap"></div>
   <div data-role="button" class="ui-btn-create">
      Read from card
   </div>
   <div class="gap"></div>
   <div data-role="button" class="ui-btn-create">
      Write to card
   </div>
   <div class="gap"></div>
   <div data-role="button" class="ui-btn-create">
      Communicate with another device
   </div>
</div>
-
Defining the Contacts List Screen
- index.html Source File
The Contacts list screen displays an aggregated contact list (in mobile or wearable applications) sorted by name. The contacts are loaded from the device default address book using the Contact API methods.
<ul data-role="listview" id="list-choose">
   <li class="ui-li-multiline">
      <a href="#"> <!--Contact name-->
         <span class="ui-li-text-sub"><!--Contact phone number--></span>
      </a>
   </li>
</ul>
Selecting a list item saves the contact information in the local storage, and returns the user to the main screen.
Defining the Transfer Screen
The transfer screen is simply a countdown screen to give the user 10 seconds to communicate with another device or a tag.
- app.ui.js Source File
-
The transfer page is displayed shortly when the user taps the Read from card, Write to card, or Communicate with another device button on the main screen.
$.mobile.changePage('#transfer'); -
After the pageshow event, the screen is prepared according to the selected button. The getDefaultAdapter() method is used to check the NFC connection status.
$('#transfer').on('pageshow', function() { if (tizen.nfc.getDefaultAdapter().powered) { try { var option = $(this).data('option'); if (option === 'read') { self.prepareWaitingPage('Card to device', 'PUT WIRELESS TAG<br>CLOSE TO<br>YOUR DEVICE'); self.app.nfc.card.setTagDetectRead(); } else if (option === 'write') { self.prepareWaitingPage('Device to card', 'PUT WIRELESS TAG<br>CLOSE TO<br>YOUR DEVICE'); self.app.nfc.card.setTagDetectWrite(); } else { self.prepareWaitingPage('Device to device', 'PUT YOUR DEVICE<br>CLOSE TO<br>OTHER DEVICE'); self.app.nfc.peer.setTargetDetect(); } } } else { $.mobile.changePage('#start'); alert('Please turn on NFC adapter'); } }); -
The prepareWaitingPage() method defines the transfer page UI.
prepareWaitingPage: function ui_prepareWaitingPage(title, text) { var waitingBox, waitingContent, contentTransfer = $('#content-transfer'); waitingBox = $('<div class="box" id="waitingBox"></div>'); waitingContent = $(this.getWaitingContentHtml(text)); $('#header-transfer H1').text(title); contentTransfer.empty(); waitingBox.append(waitingContent); contentTransfer.append(waitingBox); $('#content-start').trigger('create'); this.app.countDown(10, $('#counter')); }, -
Finally, the screen displays a countdown from 10 to 0 using the countDown() method:
countDown: function countDown(time, obj)
{
   if (!this.counterState)
   {
      setTimeout(function()
      {
         this.countDown(time, obj);
      }.bind(this), 500);

      return;
   }

   obj.text(time);
   if (time > 0)
   {
      if (this.nfc.isPowered())
      {
         time -= 1;
         this.timeOutHandler = setTimeout(function()
         {
            this.countDown(time, obj);
         }.bind(this), 1000);
      }
      else
      {
         this.nfc.timeExpired();
      }
   }
   else
   {
      this.nfc.timeExpired();
   }
},
-
Defining the Add Contact Screen
- app.ui.js Source File
The Add contact screen displays the contact information received from another device. The user can save the contact information in the device default address book by tapping the Save button.
<div id="contact" data-role="page" data-footer-exist="true">
   <div data-role="header" id="header-contact" data-position="fixed">
      <h1>Add contact</h1>
      <a data-role="button" id="save-contact">Save</a>
   </div>

   <div data-role="content" id="content-contact"></div>

   <div data-role="footer" id="footer-contact" data-position="fixed"></div>
</div>
Initializing the Application
- config.xml Source File
The required privileges are declared in the config.xml file.
<!--Configuration file content-->
<widget ...>
   <!--Other configuration details-->
   <tizen:privilege name="http://tizen.org/privilege/nfc.admin"/>
   <tizen:privilege name="http://tizen.org/privilege/nfc.common"/>
   <tizen:privilege name="http://tizen.org/privilege/nfc.p2p"/>
   <tizen:privilege name="http://tizen.org/privilege/nfc.tag"/>
   <!--Other configuration details-->
</widget>
Setting up the NFC Connection
This section builds upon the elements described in Managing NFC Connectivity.
- app.nfc.js Source File
To create an NFC connection, get the default NFC adapter using the getDefaultAdapter() method, and launch the NFC service using the setPowered() method of the NFCAdapter interface, which takes the NFC status as a parameter.
startNFC: function nfc_startNFC()
{
   try
   {
      this.nfcAdapter = tizen.nfc.getDefaultAdapter();

      if (this.nfcAdapter.powered)
      {
         this.nfcStateMemory = true;
         this.onPowerOn();

         return;
      }

      this.nfcStateMemory = false;
      this.nfcAdapter.setPowered(true, this.onPowerOn.bind(this), this.onPowerOnFails.bind(this));

   },
}
Exchanging Contact Information with Tags
This section builds upon the elements described in Detecting NFC Tags and Peer Devices and Handling NDEF Messages.
Reading an NDEF Message from an NFC Tag
- app.nfc.card.js Source File
-
When the user taps the Read from card button on the main screen, the transfer page is displayed. The setTagListener() method of the NFCAdapter interface adds an event listener to detect whether the tag is properly attached and the NDEF message valid.
setTagDetectRead: function nfc_card_setTagDetectRead() { this.nfc.nfcAdapter.setTagListener( { onattach: this.sucTagReadAttach.bind(this), ondetach: this.nfc.sucDetach.bind(this.nfc) }); } -
When the tag is attached, the readNDEF() event is fired to retrieve the sent NDEF message information.
sucTagReadAttach: function nfc_card_sucTagReadAttach(tag) { try { if (!tag.isSupportedNDEF) { throw {message: "This tag doesn't support NDEF"}; } tag.readNDEF(this.nfc.readMessage.bind(this.nfc), this.readMessageErr.bind(this)); } } -
The readMessage() method is used to get the sent information record, retrieve the contact, and display the Add contact screen.
readMessage: function nfc_readMessage(message)
{
   try
   {
      this.fillRecordInfo(message.records[0]);
   }
},
fillRecordInfo: function nfc_fillRecordInfo(record)
{
   try
   {
      var contactsData = this.resolveContact(this.convertNDEF2phoneNumber(record.payload));
      this.app.nfc.displayContact(contactsData);
   }
}
The retrieved contact information can be saved using the methods of the Contact API.
-
Writing an NDEF Message to the NFC Tag
- app.nfc.card.js Source File
-
When the user taps the Write to card button on the main screen, the transfer page is displayed, and the setTagDetectWrite() method is called. The setTagListener() method adds an event listener to detect whether the tag is successfully attached.
setTagDetectWrite: function nfc_card_setTagDetectWrite() { var suc = { onattach: this.sucTagWriteAttach.bind(this), ondetach: this.nfc.sucDetach.bind(this.nfc) }; this.nfc.nfcAdapter.setTagListener(suc); } -
When the tag is attached, the contact is prepared for sending it over the NFC connection. The prepareForNFC() and phoneNumber2NDEF() methods convert the contact object to VCARD_30 format, create a new NDEFMessage object, and attach it to the NDEFRecordMedia record with the VCARD_30 data. The NDEF message is saved to the tag and the main screen of the application is displayed.
sucTagWriteAttach: function nfc_card_sucTagWriteAttach(tag)
{
   var newMessage = null, fullContact = '';
   try
   {
      /* Local storage contains the contact object */
      fullContact = this.nfc.prepareForNFC(localStorage);
      newMessage = this.nfc.phoneNumber2NDEF(fullContact);
      if (!tag.isSupportedNDEF)
      {
         throw {message: "This tag doesn't support NDEF"};
      }
      tag.writeNDEF(newMessage,
                    this.sucSend.bind(this),
                    this.errSend.bind(this));
   }
}
-
Exchanging Contact Information with Peers
This section builds upon the elements described in Detecting NFC Tags and Peer Devices and Exchanging NDEF Data with Peers.
The data exchange functionality is implemented in the app.nfc.peer.js file.
- Sending Information
-
When the user taps the Communicate with another device button on the main screen, the transfer page is displayed. The setPeerListener() method of the NFCAdapter interface adds an event listener to detect whether the peer is properly attached.
setTargetDetect: function nfc_peer_setTargetDetect() { var successCallbacks = { onattach: this.sucTargetAttach.bind(this), ondetach: this.nfc.sucDetach.bind(this.nfc) }; try { this.nfc.nfcAdapter.setPeerListener(successCallbacks); } } -
When the peer is attached, the contact data is converted to an NDEF message format and sent to the peer device using the sendNDEF() method.
sucTargetAttach: function nfc_peer_sucTargetAttach(target)
   {
   var newMessage = null, fullContact = this.nfc.prepareForNFC(localStorage);
   this.nfc.nfcTarget = target;
   this.setReceiveFromTarget();
   try
   {
      newMessage = this.nfc.phoneNumber2NDEF(fullContact);
      target.sendNDEF(newMessage,
                      this.sucSendToTarget.bind(this),
                      this.errSendToTarget.bind(this));
   }
}
-
- Receiving Information
The setReceiveFromTarget() method is used to attach listeners to detect incoming NDEF messages.
setReceiveFromTarget: function nfc_peer_setReceiveFromTarget()
{
   this.nfc.nfcTarget.setReceiveNDEFListener(this.nfc.readMessage.bind(this.nfc));
}
