Graphic UI Component: Drawing Simple Images Using Evas Objects
This tutorial demonstrates how you can draw a rectangle or a line image on the screen using Evas objects available in the EFL UI component library.
The EFL has the following types of non-container objects with a visual appearance that can be drawn on the canvas:
- Evas_Object_Rectangle
- Evas_Object_Image
- Evas_Object_Text
- Evas_Object_Line
- Evas_Object_TextBlock
- Evas_Object_Polygon
Warm-up
Become familiar with the Evas API basics by learning about:
-
Drawing a Rectangle or Line
Draw a rectangle or a line object on the screen in various sizes and colors.
-
Implementing Gradation
Represent a gradation effect using the rectangle object.
-
Resizing Images
Adjust the loaded image size and draw on the screen.
Drawing a Rectangle or Line
To draw random rectangles and lines on the screen:
- Create an elm_layout into which objects can be added:
static Evas_Object* create_main_view(appdata_s *ad) { Evas_Object *layout, *rect, *line; Evas *e; int i; layout = elm_layout_add(ad->win); e = evas_object_evas_get(layout); - Draw 10 rectangles with random size, location, color, and transparency.
Display the rectangles on evas.
   // Draw rectangles
   for (i = 0; i <= 10; i++)
   {
      int x, y, w, h, r, g, b, a;
      x = rand() % 480;
      y = rand() % 800;
      w = rand() % 480;
      h = rand() % 800;
      r = rand() % 255;
      g = rand() % 255;
      b = rand() % 255;
      a = rand() % 255;

      rect = evas_object_rectangle_add(e);
      evas_object_resize(rect, w, h);
      evas_object_move(rect, x, y);
      evas_object_color_set(rect, r, g, b, a);
      evas_object_show(rect);
   }
The coordinates and sizes cannot be expanded beyond the screen size.
- Draw 10 lines with random length, location, color, and transparency.
Display the lines on evas.
   // Draw lines
   for (i = 0; i <= 10; i++)
   {
      int x1, y1, x2, y2, r, g, b, a;
      x1 = rand() % 480;
      y1 = rand() % 800;
      x2 = rand() % 480;
      y2 = rand() % 800;
      r = rand() % 255;
      g = rand() % 255;
      b = rand() % 255;
      a = rand() % 255;

      line = evas_object_line_add(e);
      evas_object_line_xy_set(line, x1, y1, x2, y2);
      evas_object_color_set(line, r, g, b, a);
      evas_object_show(line);
   }

   return layout;
}
The coordinates cannot be expanded beyond the screen size.
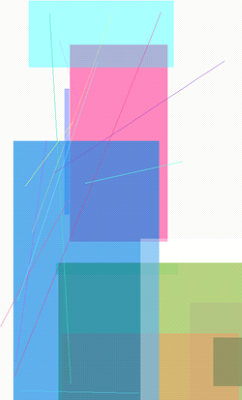
The following figure illustrates the result.
Figure: Rectangles and lines

Implementing Gradation
To draw a row of small rectangles on the screen starting from the bottom and drawing each new rectangle slightly higher than the previous one, while changing the color between each row:
- Create an elm_layout into which the rows can be added:
static Evas_Object* create_main_view(appdata_s *ad) { Evas_Object *layout, *rect, *line; Evas *e; int i; layout = elm_layout_add(ad->win); e = evas_object_evas_get(layout); int x, y, w, h, r, g, b, a; x = 0; y = 0; w = 480; h = 10; r = 0; g = 0; b = 0; a = 255; - Draw 200 rectangles and display them on evas:
   // Draw rects
   for (i = 0; i < 200; i++)
   {
      rect = evas_object_rectangle_add(e);
      evas_object_resize(rect, w, h);
      evas_object_move(rect, x, y);
      y +=4;
      evas_object_color_set(rect, r, g, b, a);
      if (r < 255)
         r +=4;
      else if (g < 255)
         g +=4;
      else
         b +=4;

      evas_object_show(rect);
   }

   return layout;
}
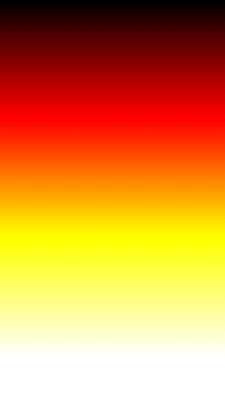
The following figure illustrates the result.
Figure: Gradation

Resizing Images
To resize images:
- Create an elm_layout into which the images can be added:
static Evas_Object* create_main_view(appdata_s *ad) { Evas_Object *layout, *img; char buf[PATH_MAX]; int i; layout = elm_layout_add(ad->win); - Add the same image 10 times on the screen, each time using random size and coordinates:
   for (i = 0; i <= 10; i++)
   {
      int x, y, w, h;
      x = rand() % 480;
      y = rand() % 800;
      w = rand() % 480;
      h = rand() % 800;

      img = elm_image_add(layout);
      snprintf(buf, sizeof(buf), "%s/image.jpg", ICON_DIR);
      elm_image_file_set(img, buf, NULL);

      evas_object_resize(img, w, h);
      evas_object_move(img, x, y);
      evas_object_show(img);
   }

   return layout;
}
The following figure illustrates the result.
Figure: Image resizing


