

WebGL - Khronos: Creating 3D Graphics
This tutorial demonstrates how you can use the WebGL graphics library and OpenGL® ES Shading Language to create 3D effects, such as texture and animation.
Warm-up
Become familiar with the WebGL - Khronos API basics by learning about:
-
Importing the WebGL Context
Import the WebGL context to your application.
-
Initializing Programs and Shaders
Bind the shaders and GLSL ES in WebGL by creating and compiling shaders and programs.
-
Initializing Buffers
Create a buffer, bind it, and store data in it.
-
Drawing Shapes on the Screen
Use attribute array data and a drawing buffer to display shapes on the screen.
-
Setting Colors
Use attribute array data and a drawing buffer to display colors on the screen.
-
Setting Textures
Use an image texture in your application.
-
Creating an Animation
Use a moving animation in your application.
-
Creating a 3D Perspective
Apply a 3D perspective to your application with the Z-index.
Follow-up
Once we have learned the basics of the WebGL - Khronos API, we can now move on to more advanced tasks, including:
-
Using Touch Events
Create a dice using texture, 3D perspective, animation, and touch events.
-
Using WebGL Frameworks
Use the three.js WebGL framework to apply illumination and camera effects.
Importing the WebGL Context
To enhance the user experience of your application with WebGL features, you must learn to import the WebGL context from the HTML5 <canvas> element:
-
Define the <canvas> element ID and set its width and height:
<body>
   <canvas id="canvas" width="300" height="300"></canvas>
</body>
Note If the width and height are not set, the default size, 300x150 px, is used. -
Use the getContext() method of the Canvas object to import the WebGL context:
<script>
   function startWegGL()
   {
      gl = getWebGLContext();
   }

   function getWebGLContext()
   {
      var webGLContext;
      var canvas = document.getElementById("canvas");

      /* Context name can differ according to the browser used */
      /* Store the context name in an array and check its validity */
      var names = ["webgl", "experimental-webgl", "webkit-3d", "moz-webgl"];
      for (var i = 0; i < names.length; ++i)
      {
         try
         {
            webGLContext = canvas.getContext(names[i]);
         }
         if (webGLContext) break;
      }

      return webGLContext;
   }
</script>
Source Code
For the complete source code related to this use case, see the following file:
Initializing Programs and Shaders
To enhance the user experience of your application with WebGL features, you must learn to bind the shaders and GLSL ES in WebGL by using shaders and programs:
-
Define the vertex shader and fragment shader using the gl_Position and gl_FragColor variables of the OpenGL® ES Shading Language (GLSL ES):
<script id="vshader" type="x-shader/x-vertex"> attribute vec2 attVertexPos; void main() { /* vec4(2D coordinates, depth, perspective) */ gl_Position = vec4(attVertexPos, 0, 2); } </script> <script id="fshader" type="x-shader/x-fragment"> void main() { /* Color stored in the gl_FragColor variable becomes the pixel color */ /* vec4(R, G, B, A) */ gl_FragColor = vec4(1, 0.5, 0.5, 1); } </script> -
Import the createShader() method to create the shaders:
<script>
   var vshader = gl.createShader(gl.VERTEX_SHADER);
   var fshader = gl.createShader(gl.FRAGMENT_SHADER);
-
Import the shaderSource() method to attach the source elements to the shaders:
gl.shaderSource(vshader, document.getElementById('vshader').text); gl.shaderSource(fshader, document.getElementById('fshader').text); -
Import the compileShader() method and compile the shaders:
   gl.compileShader(vshader);
   gl.compileShader(fshader);
Note After a shader has been used, you can use the deleteShader() method to delete it. -
Import the createProgram() method to create a new instance of the WebGLProgram object, in which the shaders are then attached:
   var program = null;
   program = gl.createProgram();
-
Import the attachShader() method to attach the shaders to the program:
   gl.attachShader(program, vshader);
   gl.attachShader(program, fshader);
-
Import the linkProgram() method to connect to the program:
gl.linkProgram(program);
-
Import the useProgram() method to enable WebGL to use the program:
   /* Shaders are loaded and used */
   gl.useProgram(program);
</script>
Note After a WebGL program has been used, you can use the deleteProgram() method to delete it.
Source Code
For the complete source code related to this use case, see the following file:
Initializing Buffers
To enhance the user experience of your application with WebGL features, you must learn to create buffers, bind them, and store data in them:
-
To create a triangle (shown on the left in the figure), define the coordinates of a triangle according to the WebGL coordinate system (shown on the right):
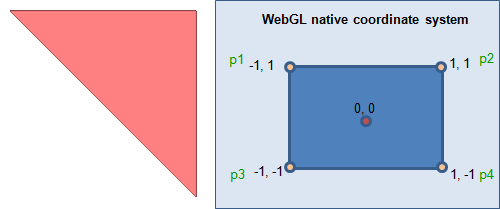
<script>
   var vertices = [1.0,  1.0,   /* p2 */
                   -1.0, 1.0,   /* p1 */
                   1.0,  -1.0]; /* p4 */
</script>
-
Import the createBuffer() method to create the vertex buffer object (VBO):
<script>
   triangleVerticesBuffer = gl.createBuffer();
-
Import the bindBuffer() method to bind the VBO:
gl.bindBuffer(gl.ARRAY_BUFFER, triangleVerticesBuffer);
-
Import the bufferData() method to store data to the VBO:
   /* Convert to Float32Array format that allows the array to be used in WebGL */
   gl.bufferData(gl.ARRAY_BUFFER, new Float32Array(vertices), gl.STATIC_DRAW);
</script>
The following figure shows the final triangle as it is displayed on the screen.
Figure: Triangle on the screen

Source Code
For the complete source code related to this use case, see the following file:
Drawing Shapes on the Screen
To enhance the user experience of your application with WebGL features, you must learn to display shapes on the screen using attribute array data and a drawing buffer:
-
Import the getAttribLocation() method to bring the attribute location from the WebGL program:
<script>
   var vertexPositionAttribute = gl.getAttribLocation(program, "attVertexPos");
The shader is an external program that is compiled. To enable the attribute to be searched and referenced in the program, allocate it to the vertexPositionAttribute variable.
-
Activate the attribute data array:
gl.enableVertexAttribArray(vertexPositionAttribute);
-
Import the vertexAttribPointer() method that indicates the data format to the shader.
The second argument value is the number of components per vertex. It can be 2, 3, or, in case of RGBA, 4.
gl.vertexAttribPointer(vertexPositionAttribute, 2, gl.FLOAT, false, 0, 0);
-
Use the drawArrays() method to send the shape to the drawing buffer:
   gl.drawArrays(gl.TRIANGLES, 0, 3);
</script>
The following table describes the arguments that can be used with the drawArrays() method and their results.
Table: Arguments for drawing shapes Type Description POINTS
The point type renders 1 point at a time.
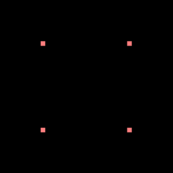
var vertices = [1.0,  1.0,
                -1.0, 1.0,
                1.0,  -1.0,
                -1.0, -1.0];

gl.vertexAttribPointer(vertexPositionAttribute, 2, gl.FLOAT, false, 0, 0);
gl.drawArrays(gl.POINTS, 0, 4);
LINES
In the lines type, 2 lines share the same vertex, but each is defined separately. In the example, 6 vertices are needed.
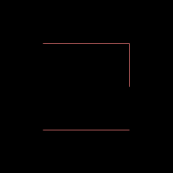
var vertices = [-1.0, 1.0,
                1.0,  1.0,

                1.0,  1.0,
                1.0,  0.0,

                1.0,  -1.0,
                -1.0, -1.0];

gl.vertexAttribPointer(vertexPositionAttribute, 2, gl.FLOAT, false, 0, 0);
gl.drawArrays(gl.LINES, 0, 6);
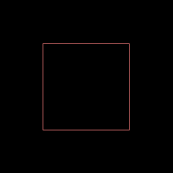
LINE_STRIP
In the line strip type, a part of the vertex is shared. In the example, 4 vertices are needed.

var vertices = [-1.0, 1.0,
                1.0,  1.0,
                1.0,  -1.0,
                -1.0, -1.0];

gl.vertexAttribPointer(vertexPositionAttribute, 2, gl.FLOAT, false, 0, 0);
gl.drawArrays(gl. LINE_STRIP, 0, 4);
LINE_LOOP
In the line loop type, the first vertex and the last vertex are connected, otherwise this type is similar to the line strip type. In the example, 4 vertices are needed.
var vertices = [-1.0, 1.0,
                1.0,  1.0,
                1.0,  -1.0,
                -1.0, -1.0];

gl.vertexAttribPointer(vertexPositionAttribute, 2, gl.FLOAT, false, 0, 0)
gl.drawArrays(gl. LINE_LOOP, 0, 4);
TRIANGLES
In the triangles type, 2 triangles are comprised of 3 vertices. In the example, 6 vertices are needed.

var vertices = [-1.0, 1.0,
                1.0,  1.0,
                0.0,  0.0,

                0.0,  0.0,
                -1.0, -1.0,
                -1.0, 0.0];

gl.vertexAttribPointer(vertexPositionAttribute, 2, gl.FLOAT, false, 0, 0);
gl.drawArrays(gl. TRIANGLES, 0, 6);
TRIANGLE_STRIP
In the triangle strip type, a triangle is created using the last 2 vertices and the next vertex. In the example, 6 vertices are needed.
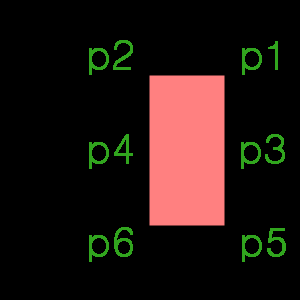
var vertices = [1.0, 1.0,   /* p1 */
                0.0, 1.0,   /* p2 */
                1.0, 0.0,   /* p3 */
                0.0, 0.0,   /* p4 */
                1.0, -1.0,  /* p5 */
                0.0, -1.0]; /* p6 */

gl.vertexAttribPointer(vertexPositionAttribute, 2, gl.FLOAT, false, 0, 0);
gl.drawArrays(gl. TRIANGLE_STRIP, 0, 6);
TRIANGLE_FAN
In the triangle fan type, the first IBO index is shared in all elements. In the example, the p0 vertex is shared by all triangles, so 4 triangles are created with 6 vertices.
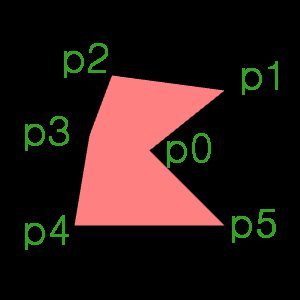
var vertices = [0.0,  0.0,   /* p0 */
                1.0,  0.8,   /* p1 */
                -0.5, 1.0,   /* p2 */
                -0.8, 0.2,   /* p3 */
                -1.0, -1.0,  /* p4 */
                1.0,  -1.0]; /* p5 */

gl.vertexAttribPointer(vertexPositionAttribute, 2, gl.FLOAT, false, 0, 0);
gl.drawArrays(gl. TRIANGLE_FAN, 0, 6);
Source Code
For the complete source code related to this use case, see the following files:
Setting Colors
To enhance the user experience of your application with WebGL features, you must learn to set colors using attributes and a buffer:
-
Define the vertex shader and fragment shader using the gl_Position and gl_FragColor variables of the OpenGL® ES Shading Language (GLSL ES):
<script id="vshader" type="x-shader/x-vertex"> attribute vec2 attVertexPos; attribute vec4 attVertexColor; varying vec4 vColor; void main() { gl_Position = vec4(attVertexPos, 0, 2); vColor = attVertexColor; } </script> <script id="fshader" type="x-shader/x-fragment"> precision mediump float; varying vec4 vColor; void main() { gl_FragColor = vColor; } </script> -
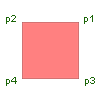
Define a rectangular vertex comprised of 2 triangles:
<script>
   var vertices = [1.0,  1.0,   /* p1 */
                   -1.0, 1.0,   /* p2 */
                   1.0,  -1.0,  /* p3 */
                   -1.0, -1.0]; /* p4 */
-
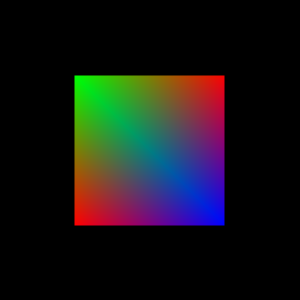
Create the color buffer and render the 2 triangles using the gl.TRIANGLE_STRIP attribute:
   /* Define the color of each vertex as an array */
   var colors = [1.0, 0.0, 0.0, 1.0,  /* Red */
                 0.0, 1.0, 0.0, 1.0,  /* Green */
                 0.0, 0.0, 1.0, 1.0,  /* Blue */
                 1.0, 0.0, 0.0, 1.0]; /* Red */

   /* Create a buffer for storing the color value */
   var triangleVerticesColorBuffer = gl.createBuffer();
   /* Bind the buffer */
   gl.bindBuffer(gl.ARRAY_BUFFER, triangleVerticesColorBuffer);
   /* Store data in the buffer */
   gl.bufferData(gl.ARRAY_BUFFER, new Float32Array(colors), gl.STATIC_DRAW);

   /* Bring the color attribute position from the WebGlProgram instance */
   var vertexColorAttribute =  gl.getAttribLocation(program, "attVertexColor");
   /* Activate the attribute data array */
   gl.enableVertexAttribArray(vertexColorAttribute);
   gl.vertexAttribPointer(vertexColorAttribute, 4, gl.FLOAT, false, 0, 0);

   gl.drawArrays(gl.TRIANGLE_STRIP, 0, 4);
</script>
The following figure shows the result as it is displayed on the screen.
Figure: Color on the screen
Source Code
For the complete source code related to this use case, see the following file:
Setting Textures
To enhance the user experience of your application with WebGL features, you must learn to use a texture, which is an image applied to the surface:
-
Define the vertex shader and fragment shader using the gl_Position and gl_FragColor variables of the OpenGL® ES Shading Language (GLSL ES). In this example, the texture coordinate attribute is used instead of the vertex coordinate attribute.
Set the variable to pass the texture coordinate over to the fragment shader. Define the formula for calculating the texture coordinates.
Note The coordinate range of a vertex is -1 ~ 1, and the coordinate range of a texture is 0 ~ 1. <script id="vshader" type="x-shader/x-vertex"> attribute vec2 attVertexPos; varying highp vec2 varTextureCoord; void main(void) { gl_Position = vec4(attVertexPos, 0, 2.0); varTextureCoord = 0.5 * attVertexPos.xy + 0.5; } </script> <script id="fshader" type="x-shader/x-fragment"> varying highp vec2 varTextureCoord; uniform sampler2D unfSampler; /* Used to access the texture */ void main(void) { /* texture2D(texture sampler, texture coordinate) */ gl_FragColor= texture2D(unfSampler, vec2(varTextureCoord.s, varTextureCoord.t)); } </script>Note The texture coordinates uses the s, t pair. -
Create a new texture instance using the createTexture() method:
<script>
   var texture = gl.createTexture();
Note After a texture has been used, you can use the deleteTexture() method to delete it. -
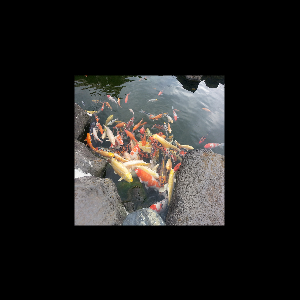
Load the image file to be used as texture data, and bind the texture using the bindTexture() method:
   var textureImage = new Image();
   textureImage.onload = function()
   {
      loadedTextureHandler(texture);
   };
   textureImage.src = "images/carp.jpg"

   function loadedTextureHandler(texture)
   {
      /* Initialize texture */
      gl.bindTexture(gl.TEXTURE_2D, texture);
      gl.pixelStorei(gl.UNPACK_FLIP_Y_WEBGL, true);
The image data loaded in HTML has the opposite y-axis as the webGL direction. Use the gl.UNPACK_FLIP_Y_WEBGL attribute to reverse the data and store it.
-
Use the loaded image file to fill the texture data. The texImage2D() method assigns the image to be used as a texture, and the textParameteri() method assigns a filter.
      gl.texImage2D(gl.TEXTURE_2D, 0, gl.RGBA, gl.RGBA, gl.UNSIGNED_BYTE, textureImage);


      /* Filter texture */
      gl.texParameteri(gl.TEXTURE_2D, gl.TEXTURE_MAG_FILTER, gl.LINEAR);
      gl.texParameteri(gl.TEXTURE_2D, gl.TEXTURE_MIN_FILTER, gl.LINEAR);


      /* Wrap texture */
      gl.texParameteri(gl.TEXTURE_2D, gl.TEXTURE_WRAP_S, gl.CLAMP_TO_EDGE);
      gl.texParameteri(gl.TEXTURE_2D, gl.TEXTURE_WRAP_T, gl.CLAMP_TO_EDGE);
- Import the unfSampler uniform location to use in the program:
      var unfSampler = gl.getUniformLocation(program, "uSampler");
      gl.uniform1i(unfSampler, 0);
- Draw the image using the drawArrays() method:
      var vertexPositionAttribute = gl.getAttribLocation(program,"attVertexPos");
      gl.enableVertexAttribArray(vertexPositionAttribute);
      gl.bindBuffer(gl.ARRAY_BUFFER, triangleVerticesBuffer);
      gl.vertexAttribPointer(vertexPositionAttribute, 2, gl.FLOAT, false, 0, 0);

      gl.drawArrays(gl.TRIANGLE_STRIP, 0, 4);
   }
</script>
The following figure shows the result as it is displayed on the screen.
Figure: Texture on the screen
Source Code
For the complete source code related to this use case, see the following files:
Creating an Animation
To enhance the user experience of your application with WebGL features, you must learn to adjust and move object coordinates to create an animation:
- Calculate the central point:
<script> var r = 0.1; /* Radius */ var n = 50; /* Number of vertices */ var cx = 0; /* x axis central point */ var cy = 0; /* y axis central point */ var centerVertices = [cx, cy]; /* Common coordinates for all triangles (the central point of a circle) */ var circumVertices = []; var lastVertices = []; var vertices = []; var angle = 0.0; draw(); function draw() { gl.clear(gl.COLOR_BUFFER_BIT | gl.DEPTH_BUFFER_BIT); /* Clear the canvas */ cy = cx = Math.sin(angle) * 0.9; /* Calculate the coordinate of central point to be moved to */ centerVertices = [cx, cy]; circumVertices = []; lastVertices = []; vertices = []; - Use a trigonometric function to calculate the vertex location of a regular N polygon with the central point as the center. Store the n(50) vertex coordinates using the changed central point as the center of the array.
for (var i = 0; i < n; i++) { circumVertices.push(cx+r * Math.cos(i/n*2 * Math.PI - Math.PI/2)); circumVertices.push(cy+r * Math.sin(i/n*2 * Math.PI - Math.PI/2)); } lastVertices = [circumVertices[0], circumVertices[1]]; circumVertices = circumVertices.concat(lastVertices); vertices = vertices.concat(centerVertices); vertices = vertices.concat(circumVertices); - Change the value of the variable in order to calculate the central point. Render the circle with the central point and vertex location, using the TRIANGLE_FAN argument that allows all triangles to share a central point to make a circle.
      angle += 0.01;	/* Change the angle value to change the central point coordinates */

      var triangleVerticesBuffer = gl.createBuffer();
      gl.bindBuffer(gl.ARRAY_BUFFER, triangleVerticesBuffer);
      gl.bufferData(gl.ARRAY_BUFFER, new Float32Array(vertices), gl.STATIC_DRAW);

      var vertexPositionAttribute = gl.getAttribLocation(program,"attVertexPos");
      gl.enableVertexAttribArray(vertexPositionAttribute);
      gl.vertexAttribPointer(vertexPositionAttribute, 2, gl.FLOAT, false, 0, 0);
      gl.drawArrays(gl.TRIANGLE_FAN, 0, n + 2);
   }
- Use the setInterval() method to set the rendering interval of the circle:
   window.setInterval(function() {draw();}, 10);
</script>
Note Instead of the setInterval() method, you can also use the script-based W3C requestAnimationFrame() method.
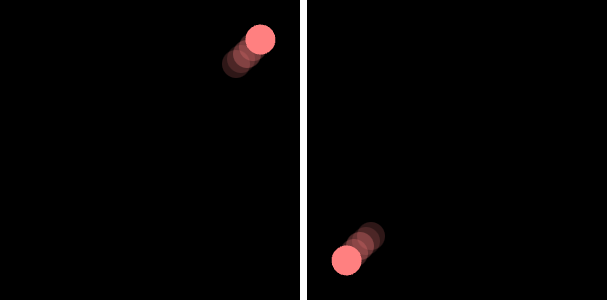
The following figure shows the animation as it is displayed on the screen.
Figure: Animation on the screen
Source Code
For the complete source code related to this use case, see the following file:
Creating a 3D Perspective
To enhance the user experience of your application with WebGL features, you must learn to create 3D perspective using the glMatrix library:
-
Set the vertex coordinate and color buffer values to draw 2 triangles:
<script>
   function setupBuffers()
   {
      var colors = [1.0, 0.5, 0.5,
                    1.0, 0.5, 0.5,
                    1.0, 0.5, 0.5,

                    1.0, 0.8, 0.0,
                    1.0, 0.8, 0.0,
                    1.0, 0.8, 0.0];

      triangleVerticesColorBuffer = gl.createBuffer();
      gl.bindBuffer(gl.ARRAY_BUFFER, triangleVerticesColorBuffer);
      gl.bufferData(gl.ARRAY_BUFFER, new Float32Array(colors), gl.STATIC_DRAW);
   }


   function setupVerticesBuffer()
   {
      var vertices = [-0.5, 0.5,  0.0,
                      0.5,  -0.5, 0.0,
                      -0.5, -0.5, 0.0,

                      0.5,  0.5,  0.0,
                      -0.5, 0.5,  0.0,
                      0.5,  -0.5, 0.0];

      triangleVerticesBuffer = gl.createBuffer();
      gl.bindBuffer(gl.ARRAY_BUFFER, triangleVerticesBuffer);
      gl.bufferData(gl.ARRAY_BUFFER, new Float32Array(vertices), gl.STATIC_DRAW);
   }

   function drawScene()
   {
      vertexColorAttribute = gl.getAttribLocation(program,"attVertexColor");
      gl.bindBuffer(gl.ARRAY_BUFFER, triangleVerticesColorBuffer);
      gl.enableVertexAttribArray(vertexColorAttribute);
      gl.vertexAttribPointer(vertexColorAttribute, 3, gl.FLOAT, false, 0,0);

      vertexPositionAttribute = gl.getAttribLocation(program,"attVertexPos");

      gl.bindBuffer(gl.ARRAY_BUFFER, triangleVerticesBuffer);
      gl.enableVertexAttribArray(vertexPositionAttribute);
      gl.vertexAttribPointer(vertexPositionAttribute, 3, gl.FLOAT, false, 0,0);

      gl.drawArrays(gl.TRIANGLES, 0, 6);
   }
</script>
-
Define the vertex shader and fragment shader with using the gl_Position and gl_FragColor variables of the OpenGL® ES Shading Language (GLSL ES), and modify the GLSL ES variables:
<script id="vshader" type="x-shader/x-vertex"> attribute vec3 attVertexPos; attribute vec3 attVertexColor; uniform mat4 uMVMatrix; /* Uniform variable delivered with the model view matrix */ uniform mat4 uPMatrix; /* Uniform variable delivered with the projection matrix */ varying vec4 vColor; void main() { /* Multiply the model view matrix and projection matrix to the original coordinates */ gl_Position = uPMatrix * uMVMatrix * vec4(attVertexPos, 1.0); vColor = vec4(attVertexColor, 1.0); } </script> <script id="fshader" type="x-shader/x-fragment"> precision mediump float; varying vec4 vColor; void main() { gl_FragColor = vColor; } </script> -
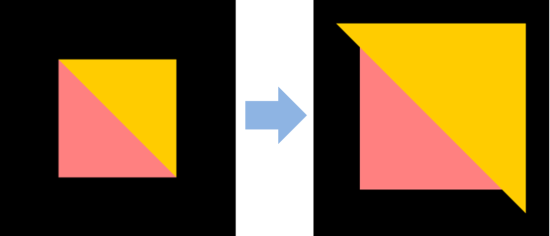
Edit the z coordinate of the right triangle to apply perspective:
<script>
   gl.viewport(0, 0, canvas.width, canvas.height);
   mat4.perspective(45, canvas.width / canvas.height , 0.1, 100.0, pMatrix);
   mat4.identity(mvMatrix);
   mat4.translate(mvMatrix, [0, 0, -2.0]);
</script>
-
Download the glMatrix library (gl-matrix-min.js) and include it in the HTML:
<script src="js/lib/gl-matrix-min.js"></script>
-
Declare the variable to store the model view matrix and projection matrix:
<script>
   var mvMatrix = mat4.create();
   var pMatrix = mat4.create();
</script>
-
Check that the location of the uPMatrix and uMVMatrix uniforms can be used in program:
<script>
   function getMatrixUniforms()
   {
      pMatrixUniform = gl.getUniformLocation(program, "uPMatrix");
      mvMatrixUniform = gl.getUniformLocation(program, "uMVMatrix");
   }

   function setMatrixUniforms()
   {
      gl.uniformMatrix4fv(pMatrixUniform, false, pMatrix);
      gl.uniformMatrix4fv(mvMatrixUniform, false, mvMatrix);
   }
</script>
The following figure shows the 3D perspective as it is displayed on the screen.
Figure: 3D perspective on the screen
Source Code
For the complete source code related to this use case, see the following files:
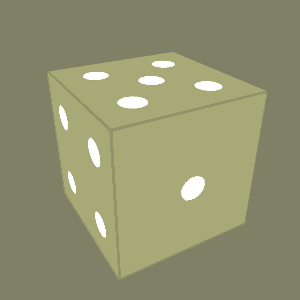
Using Touch Events
To enhance the user experience of your application with WebGL features, you must learn to apply a texture and 3D perspective with touch events using the glMatrix library. The following example demonstrates how to display and turn a dice on the screen based on touch events.
-
Define the vertex shader and fragment shader using the gl_Position and gl_FragColor variables of the OpenGL® ES Shading Language (GLSL ES):
<script id="vshader" type="x-shader/x-vertex"> attribute vec3 attVertexPos; /* Vertex coordinate attribute */ attribute vec2 attTextureCoord; /* Texture coordinate attribute */ uniform mat4 unifMVMatrix; /* Model–view uniform */ uniform mat4 unifPMatrix; /* Projection matrix uniform */ /* Texture coordinate storing variable used in the fragment shader */ varying vec2 vTextureCoord; void main(void) { /* Multiply the model-view matrix and projection matrix to the original coordinates to apply the 3D perspective */ gl_Position = unifPMatrix * unifMVMatrix * vec4(attVertexPos, 1.0); /* Store the texture coordinates */ vTextureCoord = attTextureCoord; } </script> <script id="fshader" type="x-shader/x-fragment"> /* Use a floating point arithmetic value to define the display precision (highp, mediump, or lowp) */ precision mediump float; varying vec2 vTextureCoord; uniform sampler2D unifSampler; /* Handle the cube mapped texture */ void main(void) { gl_FragColor = texture2D(unifSampler, vec2(vTextureCoord.s, vTextureCoord.t)); } </script> -
Define the variables to be used and the methods to be executed when the window is loaded:
<script> var gl = null; var program = null; var diceTexture; var mvMatrix = mat4.create(); var pMatrix = mat4.create(); var cubeVertexPositionBuffer; /* Buffer for vertex coordinate information */ var cubeVertexTextureCoordBuffe; /* Buffer for texture coordinate information */ var cubeVertexIndexBuffer; /* Buffer for index information */ var xRot = 30; var yRot = 30; window.onload = startWegGL; function startWegGL() { gl = getWebGLContext(); initShaders(); initBuffers(); initTexture(drawScene); gl.clearColor(0.5,0.5,0.4,1.0); gl.enable(gl.DEPTH_TEST); initEvent(); } </script> -
Use the getContext() method of the canvas object to import the WebGL context:
<script> function getWebGLContext() { canvas = document.getElementById("canvas"); var webGLContext = canvas.getContext("experimental-webgl"); return webGLContext } </script> <body> <canvas id="canvas" width="300" height="300"></canvas> </body> -
Create the shaders and programs using the createShader() and createProgram() methods:
<script> function initShaders() { var vshader = gl.createShader(gl.VERTEX_SHADER); var fshader = gl.createShader(gl.FRAGMENT_SHADER); gl.shaderSource(vshader, document.getElementById('vshader').text); gl.shaderSource(fshader, document.getElementById('fshader').text); gl.compileShader(vshader); gl.compileShader(fshader); program = gl.createProgram(); gl.attachShader(program, vshader); gl.attachShader(program, fshader); gl.linkProgram(program); /* Link to program */ gl.useProgram(program); /* Shaders are loaded and used */ program.vertexPositionAttribute = gl.getAttribLocation(program,"attVertexPos"); gl.enableVertexAttribArray(program.vertexPositionAttribute); program.textureCoordAttribute = gl.getAttribLocation(program, "attTextureCoord"); gl.enableVertexAttribArray(program.textureCoordAttribute); program.pMatrixUniform = gl.getUniformLocation(program, "unifPMatrix"); program.mvMatrixUniform = gl.getUniformLocation(program, "unifMVMatrix"); - To send the loaded texture image to the shader program, and add a reference to the shader program unifSampler location:
      program.samplerUniform = gl.getUniformLocation(program, "unifSampler");
   }
-
Initialize the buffer:
function initBuffers() { vertices = [-1.0, -1.0, 1.0, 1.0, -1.0, 1.0, 1.0, 1.0, 1.0, -1.0, 1.0, 1.0, /* Front */ -1.0, -1.0, -1.0, -1.0, 1.0, -1.0, 1.0, 1.0, -1.0, 1.0, -1.0, -1.0, /* Back */ -1.0, 1.0, -1.0, -1.0, 1.0, 1.0, 1.0, 1.0, 1.0, 1.0, 1.0, -1.0, /* Top */ -1.0, -1.0, -1.0, 1.0, -1.0, -1.0, 1.0, -1.0, 1.0, -1.0, -1.0, 1.0, /* Bottom */ 1.0, -1.0, -1.0, 1.0, 1.0, -1.0, 1.0, 1.0, 1.0, 1.0, -1.0, 1.0, /* Right */ -1.0, -1.0, -1.0, -1.0, -1.0, 1.0, -1.0, 1.0, 1.0, -1.0, 1.0, -1.0]; /* Left */ cubeVertexPositionBuffer = gl.createBuffer(); gl.bindBuffer(gl.ARRAY_BUFFER, cubeVertexPositionBuffer); /* Convert to Float32Array */ gl.bufferData(gl.ARRAY_BUFFER, new Float32Array(vertices), gl.STATIC_DRAW); cubeVertexPositionBuffer.itemSize = 3; cubeVertexPositionBuffer.numItems = 24; var textureCoords = [0.0, 0.5, 0.25, 0.5, 0.25, 1.0, 0.0, 1.0, /* Front */ 0.5, 0.5, 0.75, 0.5, 0.75, 1.0, 0.5, 1.0, /* Back */ 0.0, 0.5, 0.25, 0.5, 0.25, 0.0, 0.0, 0.0, /* Top */ 0.25, 0.5, 0.5, 0.5, 0.5, 0.0, 0.25, 0.0, /* Bottom */ 0.25, 0.5, 0.5, 0.5, 0.5, 1.0, 0.25, 1.0, /* Right */ 0.75, 0.5, 1.0, 0.5, 1.0, 1.0, 0.75, 1.0]; /* Left */ cubeVertexTextureCoordBuffer = gl.createBuffer(); gl.bindBuffer(gl.ARRAY_BUFFER, cubeVertexTextureCoordBuffer); gl.bufferData(gl.ARRAY_BUFFER, new Float32Array(textureCoords), gl.STATIC_DRAW); cubeVertexTextureCoordBuffer.itemSize = 2; cubeVertexTextureCoordBuffer.numItems = 24; cubeVertexIndexBuffer = gl.createBuffer(); gl.bindBuffer(gl.ELEMENT_ARRAY_BUFFER, cubeVertexIndexBuffer); var cubeVertexIndices = [0, 1, 2, 0, 2, 3, /* Front */ 4, 5, 6, 4, 6, 7, /* Back */ 8, 9, 10, 8, 10, 11, /* Top */ 12, 13, 14, 12, 14, 15, /* Bottom */ 16, 17, 18, 16, 18, 19, /* Right */ 20, 21, 22, 20, 22, 23]; /* Left */ gl.bufferData(gl.ELEMENT_ARRAY_BUFFER, new Uint16Array(cubeVertexIndices), gl.STATIC_DRAW); cubeVertexIndexBuffer.itemSize = 1; cubeVertexIndexBuffer.numItems = 36; } -
Initialize the WebGL texture and load the image to be used as the texture (the figure shows the coordinates of the image to be loaded):
   function initTexture(callback)
   {
      textureImage = new Image();
      textureImage.onload = function()
      {
         handleLoadedTexture(textureImage)
         if (callback) callback();
      }
      textureImage.src = "images/dice.gif";
   }

   function handleLoadedTexture(textureImage)
   {
      diceTexture = gl.createTexture();
      gl.bindTexture(gl.TEXTURE_2D, diceTexture);

      gl.pixelStorei(gl.UNPACK_FLIP_Y_WEBGL, true);
      gl.texImage2D(gl.TEXTURE_2D, 0, gl.RGBA, gl.RGBA, gl.UNSIGNED_BYTE, textureImage);

      gl.texParameteri(gl.TEXTURE_2D, gl.TEXTURE_MAG_FILTER, gl.NEAREST);
      gl.texParameteri(gl.TEXTURE_2D, gl.TEXTURE_MIN_FILTER, gl.NEAREST);
   }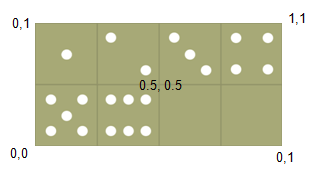
-
Define the rendering location and canvas width and height:
function drawScene() { gl.viewport(0, 0, canvas.width, canvas.height); gl.clear(gl.COLOR_BUFFER_BIT | gl.DEPTH_BUFFER_BIT); /* Clear the canvas */ - Import the mat4() method module and define it using the utility methods:
Note The perspective() method is not WebGL-embedded, so it must be used directly, or a 3rd party matrix library must be used. mat4.perspective(45, canvas.width / canvas.height, 0.1, 100.0, pMatrix); mat4.identity(mvMatrix); mat4.translate(mvMatrix, [0.0, 0.0, -5.0]); mat4.rotate(mvMatrix, xRot * Math.PI / 180 , [1, 0, 0]); mat4.rotate(mvMatrix, yRot * Math.PI / 180, [0, 1, 0]); gl.bindBuffer(gl.ARRAY_BUFFER, cubeVertexPositionBuffer); gl.vertexAttribPointer(program.vertexPositionAttribute, cubeVertexPositionBuffer.itemSize, gl.FLOAT, false, 0, 0); gl.bindBuffer(gl.ARRAY_BUFFER, cubeVertexTextureCoordBuffer); gl.vertexAttribPointer(program.textureCoordAttribute, cubeVertexTextureCoordBuffer.itemSize, gl.FLOAT, false, 0, 0); gl.activeTexture(gl.TEXTURE0); gl.bindTexture(gl.TEXTURE_2D, diceTexture); gl.uniform1i(program.samplerUniform, 0); gl.bindBuffer(gl.ELEMENT_ARRAY_BUFFER, cubeVertexIndexBuffer); gl.uniformMatrix4fv(program.pMatrixUniform, false, pMatrix); gl.uniformMatrix4fv(program.mvMatrixUniform, false, mvMatrix); gl.drawElements(gl.TRIANGLES, cubeVertexIndexBuffer.numItems, gl.UNSIGNED_SHORT, 0); }
-
Add touch events:
   var touches;
   function initEvent()
   {
      var startPosX;
      var startPosY;
      var movedPosX;
      var movedPosY;

      function mouseMoveHandler(e)
      {
         movedPosX = e.touches[0].pageX - startPosX;
         movedPosY = e.touches[0].pageY - startPosY;
         xRot += movedPosY * 0.05;
         yRot += movedPosX * 0.05;

         drawScene();
      }

      canvas.addEventListener('touchstart', function(e)
      {
         touches = e.touches.item(0);

         startPosX = touches.pageX;
         startPosY = touches.pageY;

         canvas.addEventListener('touchmove', mouseMoveHandler)
      });

      canvas.addEventListener('touchend', function(e)
      {
         canvas.removeEventListener('touchmove', mouseMoveHandler)
      })

      canvas.addEventListener('touchend', function()
      {
         canvas.removeEventListener('touchmove', mouseMoveHandler)
      });
   }
</script>
The following figure shows the dice as it is displayed on the screen.
Figure: Dice on the screen
Source Code
For the complete source code related to this use case, see the following files:
Using WebGL Frameworks
To enhance the user experience of your application with WebGL features, you must learn to use the three.js framework:
-
Download the three.js library and included it in HTML file:
<head>
   <script src="js/lib/three.js"></script>
</head>
-
Set the area to allocate the <canvas> element in HTML, and to adjust the camera and light settings:
<body>
   <div>
      <span id='webGLContainer'></span>
      <span>
         <table style='padding: 0px; background: black' border="1"  cellspacing="0" cellpadding="5">
            <tr>
               <td colspan="2" class="hd"><b>directionalLight</b></td>
            </tr>
            <tr>
               <td align='right'>X:</td>
               <td width='150px'><input id="slider-lx" type="range" min="-1" max="1" step="0.01" /></td>
            </tr>
            <tr>
               <td align='right'>Y:</td>
               <td width='150px'><input id="slider-ly" type="range" min="-1" max="1" step="0.01" /></td>
            </tr>
            <tr>
               <td align='right'>Z:</td>
               <td width='150px'><input id="slider-lz" type="range" min="-1" max="1" step="0.01" /></td>
            </tr>
            <tr>
               <td colspan="2" class="hd" ><b>Camera</b></td>
            </tr>
            <tr>
               <td align='right'>Z:</td>
               <td width='150px'><input id="slider-cz" type="range" type="range" min="300" max="800" step="10" /></td>
            </tr>
            <tr>
               <td align='right'>rotate-X:</td>
               <td width='150px'><input id="slider-cax" type="range" min="-0.5" max="0.5" step="0.01"/></td>
            </tr>
            <tr>
               <td align='right'>rotate-Y:</td>
               <td width='150px'><input id="slider-cay" type="range" min="-0.5" max="0.5" step="0.01"/></td>
            </tr>
         </table>
      </span>
   </div>
</body>
-
Define the variables to be used and the methods to be executed when the window is loaded. Once the window load is complete, import the startWebGl() method.
<script> var canvasWidth = 250; /* Canvas width */ var canvasHeight = 250; /* Canvas height */ var renderer = null; /* Variable containing the WebGLRenderer object */ var camera = null; /* Variable containing the PerspectiveCamera object */ var scene = null; /* Variable containing the Scene object */ var components = {}; /* Object type variable containing, for example, light and mesh information */ window.onload = startWegGL; function startWegGL() { setupWebGLRenderer(); setupCamera(); setupScene(); animate(); manipulate(); } -
Create a new WebGLRenderer instance and, after setting the canvas size, add the domElement to the designated HTML location:
function setupWebGLRenderer() { renderer = new THREE.WebGLRenderer(); renderer.setSize(canvasWidth, canvasHeight); /* Add the canvas element to HTML */ document.getElementById('webGLContainer').appendChild(renderer.domElement); } -
Create a new PerspectiveCamera instance:
   function setupCamera()
   {
      camera = new THREE.PerspectiveCamera(45, canvasWidth / canvasHeight, 1, 1000);
      camera.position.z = 500;
   }
Note In WebGL, there is no Camera object. -
Create a new Scene instance and create the mesh and light elements using the createMeshs() and setupLight(); methods:
function setupScene() { scene = new THREE.Scene(); createMeshs(); setupLight(); /* Circulate components and add the mesh and light elements to the scene object */ for (n in components) { scene.add(components[n]); } } function createMeshs() { /* Create the cube mesh */ components.cubeMesh = (function() { var cube = new THREE.Mesh(new THREE.CubeGeometry(100, 100, 100), new THREE.MeshLambertMaterial({color: new THREE.Color(0xff8080)})); cube.overdraw = true; cube.rotation.x = Math.PI * 0.1; cube.position.x = -50; return cube; })(); /* Create the sphere mesh */ components.sphereMesh = (function() { var sphere = new THREE.Mesh(new THREE.SphereGeometry(50, 40, 40), new THREE.MeshLambertMaterial({color: new THREE.Color(0xff8080)})); sphere.overdraw = true; sphere.position.x = 50; sphere.position.z = 50; return sphere; })(); /* Create the plane mesh */ components.planeMesh = (function() { var plane = new THREE.Mesh(new THREE.PlaneGeometry(300, 300, 10,0), new THREE.MeshLambertMaterial({color:'red'})); plane.overdraw = true; plane.position.y = -100; plane.rotation.x = Math.PI * -0.4; return plane; })(); } function setupLight() { /* Create a new DirectionalLight instance */ var directionalLight = new THREE.DirectionalLight(0xffffff); /* Set the DirectionalLight location */ directionalLight.position.set(0, 0, 1).normalize(); /* Set directionalLight as a component element */ components.directionalLight = directionalLight; /* Create a new AmbientLight instance and set it as a component element */ components.ambientLight = new THREE.AmbientLight(0x915656); } -
Add an animation:
function animate() { var speed= 0.2; var lastTime = 0; var angle = 0.0; (function moveWebGLObject() { /* Update */ var time = (new Date()).getTime(); var timeDiff = time - lastTime; var angleChange = speed * timeDiff * 2 * Math.PI / 1000; components.cubeMesh.rotation.x = components.cubeMesh.rotation.z = components.cubeMesh.rotation.y += angleChange; var range = Math.sin(angle); if (range < 0) { range *=-1; } components.sphereMesh.position.y = range * 200 - 50; lastTime = time; /* Render */ renderer.render(scene, camera); /* Request a new frame */ requestAnimationFrame(function() { moveWebGLObject(); }); angle += 0.03; })(); } -
Adjust the camera and light location using events in the manipulate() method:
   function manipulate()
   {
      /* Search for the HTML <input type='range'> element as the ID value and store it in the variable */
      var sliderLx= document.getElementById('slider-lx');
      var sliderLy= document.getElementById('slider-ly');
      var sliderLz= document.getElementById('slider-lz');

      var sliderCz = document.getElementById('slider-cz');

      var sliderCax = document.getElementById('slider-cax');
      var sliderCay = document.getElementById('slider-cay');

      /* Add an event listener to each <input type='range'> element */
      sliderLx.addEventListener('change', function(){changeLightDirection(this,"x")});
      sliderLy.addEventListener('change', function(){changeLightDirection(this,"y")});
      sliderLz.addEventListener('change', function(){changeLightDirection(this,"z")});

      sliderCz.addEventListener('change', function(){changeCameraDirection(this,"z")});

      sliderCax.addEventListener('change', function(){changeCameraAngle(this,"x")});
      sliderCay.addEventListener('change', function(){changeCameraAngle(this,"y")});

      /* When a change occurs, a related event is fired, and the axis parameter is handled */

      function changeLightDirection(target, axis)
      {
         components.directionalLight.position[axis] = target.value;
         components.directionalLight.position.set(components.directionalLight.position.x,
                                                  components.directionalLight.position.y,
                                                  components.directionalLight.position.z).normalize();
      }

      function changeCameraDirection(target, axis)
      {
         camera.position[axis] = target.value;
      }

      function changeCameraAngle(target, axis)
      {
         camera.rotation[axis] = target.value;
      }
   }
</script>
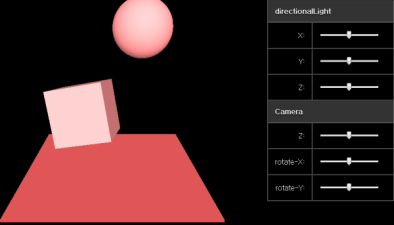
The following figure shows the final result as it is displayed on the screen.
Figure: Final result
Source Code
For the complete source code related to this use case, see the following files:
