Task: Sensor Ball
This task, based on the SensorBall sample delivered with the Tizen SDK, demonstrates how you can use the Sensor API to read and process gyro sensor data. For more information on the sample functionality and creating the sample with the full source code, see the SensorBall.
This task consists of the following parts:
- Defining the Application Layout defines how to create the application screens.
- Initializing the Application defines how to initialize the application.
- Managing the Gyro Sensor Data defines how to handle the sensor data.
This sample is a fully functional application which uses the gyro sensor to create a game where the game elements move on the screen based on the sensor data.
Defining the Application Layout
The SensorBall sample application layout contains only 1 screen: the main screen that displays the game.
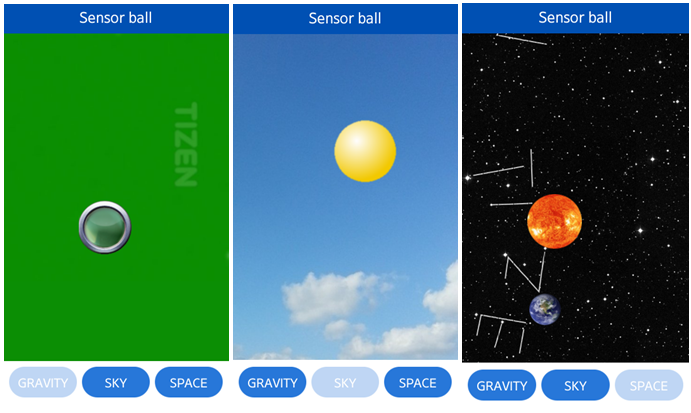
The following figure shows the main screen of the application.
Figure: SensorBall screen

Defining the Main Screen
- index.html Source File
-
The main screen displays the game screen. The header section of the screen is defined within a <div> element whose data-role attribute is set to header. The header section determines the title of the screen.
<body>
   <div data-role="page" id="mainPage">
      <!--Header section-->
      <div data-role="header" data-position="fixed">
         <h1>Sensor ball</h1>
      </div>
-
The actual content section of the screen is defined within a <div> element whose data-role attribute is set to content. The content section of the main screen contains a background image (defined in the style.css file based on the background class), and the image of the game ball.
      <!--Content section-->
      <div data-role="content" class="background background1" data-scroll="none">
         <div id="main">
            <img id="image1" class="ball" src="./images/ball1.png" />
         </div>
      </div>
-
The footer section of the screen is defined within a <div> element whose data-role attribute is set to footer. The footer section contains a tab bar with buttons for switching between the animation modes of the game.
      <!--Footer section-->
      <div data-role="footer" data-position="fixed">
         <div data-role="tabbar" data-style="toolbar" id="footerControls">
            <ul>
               <li><a href="#" id="btnBall" class="ui-btn-active">BALL</a></li>
               <li><a href="#" id="btnSky">SKY</a></li>
               <li><a href="#" id="btnSpace">SPACE</a></li>
            </ul>
         </div>
      </div>
   </div>
</body>
-
- css/style.css Source File
The style.css file defines the background image for each animation mode and the size and location of the game ball.
.background1
{
   background-image: url('../images/background1.jpg');
}

.background2
{
   background-image: url('../images/background2.jpg');
}

.background3
{
   background-image: url('../images/background3.jpg');
   background-color: #000;
   overflow: hidden;
}

.ball
{
   position: absolute;
   left: 0px;
   top: 0px;
   width: 86px;
   height: 86px;
}
Initializing the Application
- config.xml Source File
The required privileges are declared in the config.xml file.
<!--Configuration file content-->
<widget ...>
   <!--Other configuration details-->
   <tizen:privilege name="http://tizen.org/privilege/application.launch"/>
</widget>
Managing the Gyro Sensor Data
This section builds upon the elements described in Detecting Device Acceleration.
Managing the Application and Window Objects
The object management functionality is implemented in the main.js file.
- Creating the Application Object
The application object is initialized when the document ready() event is fired. All the application events are bound during the initialization.
$(document).ready(function() { "use strict"; var img, contentHeight = screen.availHeight - $('div[data-role="header"]').outerHeight() - $('div[data-role="footer"]').outerHeight(); $('div[data-role="content"]').css('height', contentHeight - 33); app.gameWidth = screen.availWidth; app.ballWidth = parseInt($('.ball').css('width'), 10); app.ballHeight = parseInt($('.ball').css('height'), 10); window.addEventListener('devicemotion', app.saveSensorData.bind(app), false); app.fun(); /* Hardware Back key event */ $(window).on('tizenhwkey', function(e) { if (e.originalEvent.keyName === "back") { tizen.application.getCurrentApplication().exit(); } }); /* Button events */ $('#btnBall').bind('click', function(event) { $('#sun').remove(); app.startBall(); }); $('#btnSky').bind('click', function(event) { $('#sun').remove(); app.startSky(); }); $('#btnSpace').bind('click', function(event) { $('#sun').remove(); app.startSpace(); }); /* Screen show event */ $('#mainPage').on('pageshow', function() { app.startBall(); }); document.addEventListener('webkitvisibilitychange', function(event) { if (document.webkitVisibilityState === 'visible') { app.fun(); } }); /* Preload backgrounds */ img = $('<img>').hide(); img.attr('src', 'images/background1.png'); }); - Resizing the Window
The application handles the window resize events and sets the display accordingly.
$(window).resize(function()
{
   'use strict';
   app.gameWidth = screen.availWidth;
   app.gameHeight = $('.background').outerHeight();
});
Accessing Gyro Sensor Data
- main.js Source File
- The
devicemotion event listener calls the
saveSensorData() method each time the event takes place. The event allows the application to access information about sensor data changes.
window.addEventListener('devicemotion', app.saveSensorData.bind(app), false); - The
saveSensorData() methods stores the event (containing the gyro sensor data) for later processing.
saveSensorData: function saveSensorData(event) { "use strict"; this.event = event; } - The stored event is used by the ballEvents() and earthEvents() methods, which control the game ball and the animation of the different game modes. These methods are called repeatedly with the setTimeout() method.
- The
devicemotion event listener calls the
saveSensorData() method each time the event takes place. The event allows the application to access information about sensor data changes.

