Form: Creating the Basic Application and Layout
This tutorial explains how to create a basic application for displaying a list of contacts, and a form for displaying and editing contact information when an item is selected on the contact list.
This feature is supported in mobile applications only.
Warm-up
Become familiar with the Eina, Elementary, and Evas API basics by learning about:
-
Creating the Basic Application
Create an elementary application.
-
Creating the Naviframe
Create the application layout.
Creating the Basic Application
To create an elementary application with a single window, use the following code.
static bool
app_create(void *data)
{
   appdata_s *ad = data;
   create_gui(ad);
   return true;
}

int
main(int argc, char **argv)
{
   appdata_s ad = { 0 };
   ui_app_lifecycle_callback_s event_callback = { 0 };

   event_callback.create = app_create;

   // Zero out the structure
   memset(&ad, 0x0, sizeof(struct appdata));

   // Run the mainloop
   return ui_app_main(&argc, &argv, &event_callback, &ad);
}
Creating the Naviframe
Use a naviframe in this application to switch between different views. The first view that is displayed is the list of contacts. When a user selects an item on this list, information on the contact is displayed in a form. Both the view list and the form are opened in a naviframe, which handles the animations between the views for you. It also manages creating a back button in the top bar and launching the back animation when you select it, deletes the form view, and shows the list of contacts again.
Naviframe
The naviframe is the main layout of the window, so it takes all the space available. To configure this, use the elm_win_resize_object_add function. The first parameter is the main window, the second is the naviframe object. The naviframe is to be resized along with the window. The object (the naviframe) fills its parent (the main window) by calling the evas_object_resize_hint_weight_set function on the naviframe object. The naviframe object expands in both x and y directions. In the end, evas shows the naviframe object on the screen.
 // Create the naviframe
nav = elm_naviframe_add(win);
evas_object_size_hint_weight_set(nav, EVAS_HINT_EXPAND, EVAS_HINT_EXPAND);
elm_win_resize_object_add(win, nav);
evas_object_show(nav);
Contact List
Handle the contact list with the _create_contact_list function. This function takes the parent object as the parameter (in this case the naviframe) and returns the genlist. To create the genlist, use the following code.
static Evas_Object *
_create_contact_list(Evas_Object *parent)
{
   Evas_Object *list;
   int i;

   // Create a new genlist
   list = elm_genlist_add(parent);
   evas_object_show(list);

   // Create a new item class for the genlist
   itc = elm_genlist_item_class_new();
   itc->item_style = "default";
   // Set the callback used when the genlist text is created
   itc->func.text_get = _genlist_text_get;
   // Set the callback be used when the content of the item is created
   itc->func.content_get   = _genlist_content_get;
   itc->func.state_get = NULL;
   itc->func.del = NULL;
}
itc is a static variable containing the item class. The item class contains all functions that are called back when an item is created. In this case, create the callbacks _genlist_text_get (for labels) and _genlist_content_get (for icons). These functions are called when labels and icons of the genlist item are created.
The list of contacts is contained in an array of Contacts.
typedef struct _Contact Contact;

struct _Contact
{
   const char *name;
   const char *mobile;
   const char *address;
   const char *email;
   const char *icon;
};

static Contact contacts[] =
{
   {"Alexander Holmes", "+1234567896", "", "alexander_holmes@tizen.org", "c1.png"},
   {"Lara Alvaréz",    "+9876543216", "", "lara_alvares@tizen.org", "c2.png"   },
   {"Aksel Møller",    "+1679432846", "", "aksel_moller@tizen.org", "c3.png"   },
   {"Anir Amghar",      "+1679432846", "", "anir_amghar@tizen.org", "c4.png"    },
   {"Noémie Cordier",    "+1679432846", "", "noemie_cordier@tizen.org", "c5.png"   },
   {"Henry Thompson",    "+1679432846", "", "henry_thompson@tizen.org", "c6.png"   },
   {"Mai Phan",       "+1679432846", "", "mai_phan@tizen.org", "c7.png"      },
};
Create a genlist item for each item of the array with the following code.
// Create a genlist item for each item in the contacts array
for (i = 0; i < EINA_C_ARRAY_LENGTH(contacts); i++)
{
   // Append the item, add a callback when the item is selected, and use the
   // current contact item as data pointer for the callbacks
   elm_genlist_item_append(list, itc,
                     &contacts[i],
                  NULL,
                     ELM_GENLIST_ITEM_NONE,
                     _contact_selected_cb,
                     &contacts[i]);
}
Attach the _contact_selected_cb callback function to the genlist item. When an item is selected in the list, the data pointer passed as the argument calls this function. Here it is a pointer on the contact. Pass the contact in the array to all the Item Class callbacks.
Push the list at the top of the naviframe with the following code.
// Create the list of contacts
list = _create_contact_list(win);

// Push the list on top of the naviframe
elm_naviframe_item_push(nav, NULL, NULL, NULL, list, NULL);
The Item class functions are called, the _genlist_text_get first.
static char *
_genlist_text_get(void *data, Evas_Object *obj EINA_UNUSED, const char *part)
{
   Contact *contact = data;

   // Return a new allocated string for the contact name
   return strdup(contact->name);
}
These functions show the index of the contact in the array and return a freshly allocated string with the name of the contact.
When the user selects an item in the list, a callback registers on the select signal and calls the corresponding function; in this case, _contact_selected_cb(). The user retrieves the index of the array passed in the data and creates the form on contact information based on this index.
The _genlist_content_get function is called several times depending on the style of the created item. In this case, with the default style for the genlist item, there are two different swallow parts. A swallow part is a container in the edje file of the genlist item, which may contain an evas object. The following figure shows the layout of different parts in the theme.
Figure: Genlist item
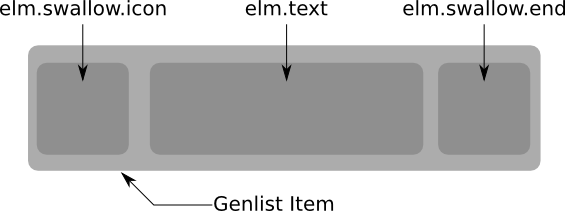
There are two elm.swallow parts. When the callback function for the creation of icons is called, the part name is passed via the part variable. Compare this variable to elm.swallow.icon for the first object and to elm.swallow.end for the icon at the end.
Icon
Create the icon when the callback is recognized. In this example, we use an elm_icon object.
static Evas_Object *
_genlist_content_get(void *data, Evas_Object *obj, const char *part)
{
   Contact *contact = data;

   // Test which part is being created
   if (!strcmp(part, "elm.swallow.icon"))
   {
         char filename[PATH_MAX];
      // Create a new icon
      Evas_Object *ic = elm_icon_add(obj);
      // Set the filename of the file which is to be loaded
      snprintf(filename, sizeof(filename), "%s%s", ICON_PATH, contact->icon);
      elm_image_file_set(ic, filename, NULL);
      // Keep the ratio squared
      evas_object_size_hint_aspect_set(ic, EVAS_ASPECT_CONTROL_VERTICAL, 1, 1);

      // Return the icon
      return ic;
   }

   return NULL;
}
Note that in case of elm.swallow.end the return is NULL, and no icon is added.
The user may question the complexity of creating a genlist, and the benefits of callbacks for the creation of items. In a genlist with thousands of elements, graphical items are not created. Only the ones currently displayed on the screen are created with the callbacks in the Genlist Item Class. Otherwise, objects are created by calling the respective callback function when the user scrolls the list.
| Note |
|---|
| When the genlist is first created, the Elementary needs to know the height of the list. All elements in the list are not necessarily the same size due to different kind of styles. Thus, the Elementary creates all elements once to know the size, and displays the scroll bars correctly. If all your items have the same height, use the elm_genlist_homogeneous_set to impose the same height to all items. The Elementary does not create the complete list as the global size is a multiple of the height of the first item. It saves you cpu time. |
Contact Form
The contact list is created inside the _create_contact_form function. This function takes a parent Evas_Object and a contact item as parameters, and returns an Evas_Object. The parent is the naviframe object, and the contact item contains the information on the contact.
To display the various information about the contact, we use boxes in this example.
Figure: Form contact layout
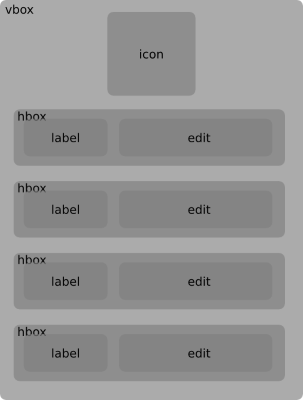
The first box is an vertical box.
vbox = elm_box_add(parent);
elm_box_align_set(vbox, 0, 0);
evas_object_show(vbox);
elm_box_align_set keeps the box element aligned to the top left corner.
To add an icon, use the _genlist_content_get function to create the icon in the genlist item. For a bigger icon, set the minimum size of the icon object to 96x96 px.
The most important function in this case is elm_box_pack_end. It adds the icon object at the end of the vbox. As the icon is the first object added, it is displayed on top of the box.
ic = elm_icon_add(vbox);
snprintf(filename, sizeof(filename), "%s%s", ICON_PATH, contact->icon);
elm_image_file_set(ic, filename, NULL);
evas_object_size_hint_min_set(ic, 96, 96);
evas_object_show(ic);
elm_box_pack_end(vbox, ic);
In the following example, add the information on the contact: the name, the mobile phone number, the postal address and the e-mail address. For each information item, create a label and an edit line. The label contains the kind of the information, and the edit box, the information itself. To set the UI components in a horizontal layout, use a horizontal box.
hbox = elm_box_add(vbox);
elm_box_horizontal_set(hbox, EINA_TRUE);
elm_box_padding_set(hbox, 32, 32);
evas_object_size_hint_weight_set(hbox, EVAS_HINT_EXPAND, 0);
evas_object_size_hint_align_set(hbox, EVAS_HINT_FILL, 0);
evas_object_show(hbox);
Change the orientation of the box with elm_box_horizontal_set. To get space between the elements of the vbox, set the padding to 32px. To set the item of the box not to expand vertically, use evas_object_size_hint_weight_set.
Create the label object, which is an elm_label. Set its text, and do not align or expand it.
label = elm_label_add(hbox);
elm_object_text_set(label, form_items[i]);
evas_object_size_hint_weight_set(label, 0, 0);
evas_object_size_hint_align_set(label, 0, 0);
evas_object_show(label);
Create the edit line, which is an elm_entry.
edit = elm_entry_add(hbox);
evas_object_size_hint_weight_set(edit, EVAS_HINT_EXPAND, EVAS_HINT_EXPAND);
evas_object_size_hint_align_set(edit, EVAS_HINT_FILL, EVAS_HINT_FILL);
evas_object_show(edit);
Add the label and the edit inside the horizontal box and add the horizontal box to the vertical box.
elm_box_pack_end(hbox, label);
elm_box_pack_end(hbox, edit);

elm_box_pack_end(vbox, hbox);
Figure: Form tutorial: form

Figure: Form tutorial: list