

Push: Using the Push Service
This tutorial demonstrates how you can use the Tizen Push Service to allow applications in a mobile device to receive notifications through the Internet even when the applications are not running.
Warm-up
Become familiar with the Push API basics by learning about:
-
Initializing the Push Service
Initialize the push service for use.
-
Connecting to the Push Service
Establish a socket connection to the push service.
-
Registering with the Push Server
Register and unregister with the push server.
- Notification management
-
Sending Push Notifications
Send push notifications from the application server to an application.
-
Handling Push Notifications
Receive notifications at different states.
-
Sending Push Notifications
-
Managing Security
Ensure the security of notifications containing sensitive information.
Initializing the Push Service
The following figure illustrates the architecture of the Tizen push service.
Figure: Tizen push service architecture
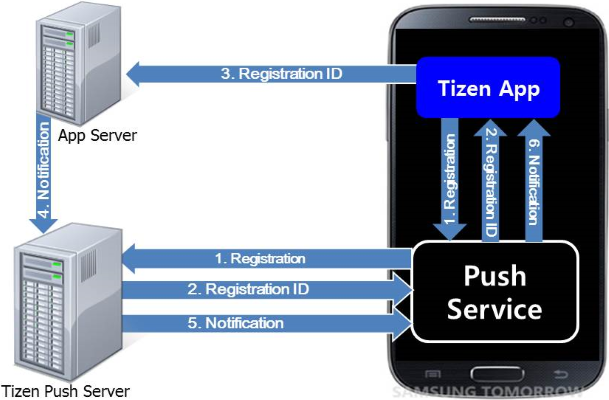
The following steps illustrate a typical scenario for using the push messaging service on a Tizen device:
- When an application is installed and launched, it sends a registration request to Tizen push server through the push service.
- If the registration request is approved, the server replies the registration ID to the application through the push service.
- The application sends the registration ID to the application server. This registration ID is used to identify the application installed in that particular device.
- When the application server needs to send a push notification to the application in that particular device, it sends the notification together with the registration ID to the push server.
- When the push server receives the notification and the registration ID, it checks which device has the application of the registration ID and then sends the notification to that device.
- When the push service receives the notification and the registration ID, it sends the notification to the destination application.
Make sure the following requirements are fulfilled:
- Internet access
To connect to the Tizen push server and receive notifications from it, your target device or emulator must be able to contact any IP address with the port 5223. If you are in an enterprise network, ensure that the proxy setting in your local network allows outgoing traffic destined for this port number.
- Package ID
When you create your project in the Tizen SDK, you are given the package ID (randomly generated by the SDK or entered by yourself). The Tizen push server identifies your applications using the package ID.
- Permission to Tizen push servers
To use the push messaging service, the application needs the permission to access the Tizen push server. Request the permission from the Tizen push service team by email, including the following information. When the team approves your request, you receive a push app ID corresponding to your package ID.
| Developer information | |
|---|---|
| Email address |
Your email address to receive the approval response. |
| Last name |
Your last name. |
| First name |
Your first name. |
| Country |
Your country of residence. |
| Application information | |
| Package ID |
The ID of the application package that uses the push messaging service. The package ID can be obtained from the .xml file in the Tizen SDK. |
| Application name |
Name of the application that uses the push service. |
| Application type |
Native application or Web application. |
| Testing purpose |
Yes or no. If you request the service for testing purposes only, the duration of the push service is limited to 3 weeks. |
| Purpose of the push notification usage |
Description of how you plan to use the push service, including the situations in which you want to use it. |
| Application launch date |
Application launch date in the YYYY/MM/DD format. |
| Service area/country |
Service area, such as Asia, Africa, America, Europe, or the country where the application is used. |
| Daily push requests |
Estimated number of daily notifications. |
| Transactions per second |
Estimated peak number of transactions per second (the recommendation is below 100). |
To set up the required library and privilege for your application:
-
To use APIs for the Tizen push service, include the <push-service.h> header file to your application:
#include <push-service.h>
-
To access the Tizen push service on the device, add the following privilege to the manifest file:
http://tizen.org/privilege/push
Connecting to the Push Service
To request or receive push notifications, establish a socket connection to the push service. All the information regarding this connection must be controlled by a connection handle which can be defined as a global variable:
push_service_connection_h push_conn;
To manage push service connections:
- Connect to the push service.
Once the connection handle is defined, use the push_service_connect() function to connect the push service:
#define PUSH_APP_ID "YOUR_PUSH_ID_HERE"

static bool app_create(void *data)
{
   int ret;

   // Connect to the push service when the application is launched
   ret = push_service_connect(PUSH_APP_ID, _state_cb, _noti_cb, NULL, &push_conn);

   if (ret != PUSH_SERVICE_ERROR_NONE)
   {
      // Your implementation here
      dlog_print(DLOG_INFO, LOG_TAG, "push_service_connect() Failed");
   }

   return true;
}
In the above example, the application establishes a socket connection to the push service using the push_service_connect() function. The YOUR_PUSH_ID_HERE argument is the push app ID received from the Tizen push server team when the access to the server was requested. Keep this push app ID confidential, otherwise your push notifications can be hijacked by malicious applications.
The _state_cb() and _noti_cb() parameters are callback functions called when the state changes or a notification arrives from the server through the push service.
The push_conn parameter is the output of the push_service_connect() function. If the connection between your application and the service is successful, the push_service_connect() function returns PUSH_SERVICE_ERROR_NONE and the push_conn connection handle is returned through the last parameter. If the push_service_connect() function returns other values, the connection to the service failed. This happens most likely when the push privilege is not added in the SDK.
This sample application establishes a connection to the service when it is launched and disconnects from the service when it terminates. Due to this, the push_service_connect() function is located in the app_create() function, which is called when the application is launched.
- Disconnect from the push service.
When the application terminates or no longer uses the push service, close the connection using the push_service_disconnect() function.
The push_service_disconnect() function closes the existing connection associated with the push_conn handle and returns all the resources allocated for the connection.
push_service_disconnect(push_conn);
push_conn = NULL;
The connection is automatically closed when the application terminates. Hence, if your application uses the push service while being launched, your application does not need this function. However, your application can disconnect the service in the middle of the application operation. If you add a toggle switch to your application for switching the push service on and off, call this function when the service is switched off.
- Handle state transitions.
After the connection to the service is made, your application is notified whenever the connection state changes. This notification is conducted through the _state_cb() callback, which is defined in the push_service_connect() function. The following figure illustrates the possible states.
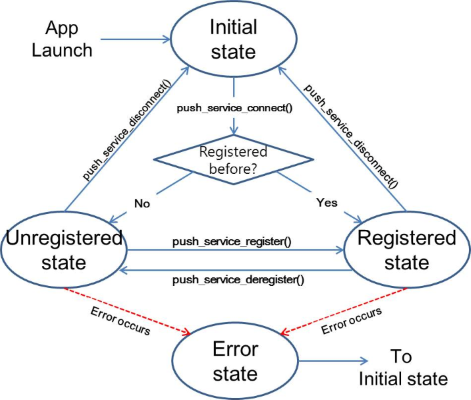
Once launched, your application is in the INITIAL state. When the application establishes a connection to the service using the push_service_connect() function, the state becomes either UNREGISTERED or REGISTERED:
- If your application is currently registered to the push server, the service forces your application to transit from the INITIAL state to the REGISTERED state. In this case, your application can request deregistration to the push server through the push service using the push_service_deregister() function. If this request is approved by the push server, the state transits to UNREGISTERED.
- If your application is not currently registered to the push server, the state transits from the INITIAL state to the UNREGISTERED state. In this case, your application can request registration to the push server through the push service using the push_service_register() function. If this request is approved by the push server, the state transits to REGISTERED.
- When an error occurs, the state transits to ERROR.
When the current state transits, the _state_cb() function is called and the new state is obtained from the first argument. The application then needs to determine its actions based on the new state:
static void _state_cb(push_service_state_e state, const char *err, void *user_data)
{
   switch (state)
   {
      case PUSH_SERVICE_STATE_UNREGISTERED:
         dlog_print(DLOG_INFO, LOG_TAG, "Arrived at STATE_UNREGISTERED");
         _on_state_unregistered(user_data);
         break;

      case PUSH_SERVICE_STATE_REGISTERED:
         dlog_print(DLOG_INFO, LOG_TAG, "Arrived at STATE_REGISTERED");
         _on_state_registered(user_data);
         break;

      case PUSH_SERVICE_STATE_ERROR:
         dlog_print(DLOG_INFO, LOG_TAG, "Arrived at STATE_ERROR");
         _on_state_error(err, user_data);
         break;

      default:
         dlog_print(DLOG_INFO, LOG_TAG, "Unknown State");
         break;
   }
}
In the above example, the _on_state_registered(), _on_state_unregistered(), and _on_state_error() functions contain the actions for the REGISTERED, UNREGISTERED, and ERROR states, respectively. Your application does not need to handle the INITIAL state because it is maintained internally, and this callback function is never invoked in this state. The second argument, err, is the error message from the push service when the state becomes ERROR. Consequently, only the _on_state_error() function takes this argument while others ignore it.
Registering with the Push Server
To receive push notifications, your application must send a registration request to the Tizen push server. When the server receives this request, it assigns a registration ID that is unique to your application on the particular device. When sending a notification from your application server, this registration ID is used as a destination address of your application. If your application no longer needs to receive push notifications, it needs to send a deregistration request to the server.
- Request registration.
After connecting to the push service, request registration using the push_service_register() function.
The function takes 3 arguments. The first argument is the connection handle that was returned from the push_service_connect() function. The second argument is the callback function that returns the result of this registration request. The last argument is the user data to be handed over to the result callback function.
static void _on_state_unregistered(void *user_data)
{
   int ret;

   // Send a registration request to the push service
   ret = push_service_register(push_conn, _result_cb, NULL);
}
The _on_state_unregistered() function containing the push_service_register() function is called when the state transits to UNREGISTERED. This sample application is designed to send the registration request as soon as it is connected to the push service. If your application requires users to login to your service, this registration request must be sent after the login process is complete.
Note that the registration request is non-blocking. If PUSH_SERVICE_ERROR_NONE returns from the push_service_register() function, your request is successfully delivered to the push service. However, it does not necessarily mean that your request is approved by the server. If the push service successfully sends your request to the server and receives an approval, the _result_cb() callback is called with PUSH_SERVICE_RESULT_SUCCESS from the first parameter:
static void _result_cb(push_service_result_e result, const char *msg, void *user_data)
{
   if (result == PUSH_SERVICE_RESULT_SUCCESS)
      dlog_print(DLOG_INFO, LOG_TAG, "Registration request is approved.");
   else
      dlog_print(DLOG_ERROR, LOG_TAG, "Registration ERROR [%s]", msg);

   return;
}
When an error occurs in the middle of the registration process, the reason is returned from the first parameter of the callback. For example, if the push server is not responding, the push_service_register() function returns PUSH_SERVICE_ERROR_NONE (because delivery to the service is successful), but the _result_cb() function is called later with PUSH_RESULT_TIMEOUT. In this case, your application does not need to request registration again because the push service keeps the previous request and sends it when the network becomes online. The msg argument is the error message from the push service if the request fails.
-
Your application transits to the REGISTERED state in one of the following cases:
- Your registration request that your application sent at the UNREGISTERED state is approved.
- Your already-registered application at the INITIAL state is successfully connected to the push service.
In both cases, the _state_cb() callback function is called with PUSH_SERVICE_STATE_REGISTERED. The application calls the _on_state_registered() function immediately, as shown in the state transitions. Although you determine the actions inside the function, the following example shows the following actions that you need to bear in mind:
- If the application has already been registered, request unread notifications to the service that has arrived before the application is launched.
- If the application is newly registered, send the registration ID issued by the push server to your application server.
static void _on_state_registered(void *user_data) { int ret; char *reg_id = NULL; char *app_id = NULL; // Request unread notifications to the push service // _noti_cb() is called if there are unread notifications ret = push_service_request_unread_notification(push_conn); // Get the registration ID ret = push_service_get_registration_id(push_conn, ®_id); if (ret != PUSH_SERVICE_ERROR_NONE) { dlog_print(DLOG_ERROR, LOG_TAG, "ERROR [%d]: push_service_get_registration_id()", ret); return; } // Send reg_id to your application server if necessary _send_reg_id_if_necessary(reg_id); if (reg_id) free(reg_id); }First, you asynchronously request notifications that have arrived before the application is launched. If there is such a notification, it can be received through the _noti_cb() function after the _on_state_registered() function returns. Once your request for unread notifications is successfully delivered, PUSH_SERVICE_ERROR_NONE is returned.
Secondly, retrieve the registration ID from the push_conn connection handle. If the ID is new or updated, you need to send it to your application server. This ID is used as a destination address to your application in a particular device. If your application has already sent the ID, you can skip this step. This logic is implemented in the _send_reg_id_if_necessary() function.
Compute the hash value of the ID and compare it with the existing hash value.
- If they are different, your current ID is different from the previous one. In that case, send the registration ID to your application server and then store the new hash value. For security, it is not safe to keep your ID as a string because it can be easily exposed.
- If they are the same, your application server already has this registration ID. In this case, the application exits this function.
#include <openssl/sha.h> #define PUSH_HASH_KEY "existing_push_reg_id" static void _send_reg_id_if_necessary(const char *reg_id) { unsigned char md[SHA_DIGEST_LENGTH]; char hash_string[2*SHA_DIGEST_LENGTH+1]; char *buf_ptr = hash_string; char *stored_hash_value = NULL; int ret, i; // Generate a hash string from reg_id SHA1((unsigned char *)reg_id, sizeof(reg_id), md); // Convert byte array to hex string for (i = 0; i < SHA_DIGEST_LENGTH; i++) { buf_ptr += sprintf(buf_ptr, "%02X", md[i]); } hash_string[2*SHA_DIGEST_LENGTH] = '\0'; // Get the saved hash string ret = preference_get_string(PUSH_HASH_KEY, &stored_hash_value); // If there is no hash string stored before or // if the stored hash string is different from the new one, // send reg_id to the server if (ret != PREFERENCE_ERROR_NONE || strncmp(stored_hash_value, hash_string, 2*SHA_DIGEST_LENGTH) !=0) { // Your implementation here to send reg_id to your application server ret = _send_reg_id(reg_id); // If reg_id is successfully sent, store the new hash value. if (!ret) { ret = preference_set_string(PUSH_HASH_KEY, hash_string); } } if (stored_hash_value) free(stored_hash_value); return; } - Request deregistration.
When your application no longer wants to receive push notifications, use the following function to request deregistration:
push_service_deregister(push_conn, _dereg_result_cb, NULL);
This function is non-blocking. If PUSH_SERVICE_ERROR_NONE returns from this function, the request is successfully received by the push service. The result of this request is returned in the _dereg_result_cb() callback function. The third argument is the pointer to the user data which is handed over to the result function.
Note that the push_service_deregister() function is not used, if the application is intended to receive push notifications while being installed. If the application is uninstalled, the push service detects the event and deregisters the application automatically. In contrast, if the application wants to receive push notifications only when a user logs in, the push_service_deregister() function must be called whenever a user logs out.
Sending Push Notifications
Once your application successfully sends its registration ID to your application server, you are ready to send push notifications from your application server to the application on that particular device. In this tutorial, a simple instruction for sending a push notification to 1 device is provided. For advanced features, refer to the detailed guide from the push server team.
To send push notifications:
- Determine the RQM server.
The request manager (RQM) servers collect your push notifications before sending them to your applications. The RQM server must be chosen based on the first 2 digits of the registration ID.
Table: RQM servers Prefix of the regId Region URL 00 US East https://useast.push.samsungosp.com:8088/spp/pns/api/push 01 US West https://uswest.push.samsungosp.com:8088/spp/pns/api/push 02 Asia Pacific Southeast https://apsoutheast.push.samsungosp.com:8088/spp/pns/api/push 03 EU West https://euwest.push.samsungosp.com:8088/spp/pns/api/push 04 Asia Pacific Northeast https://apnortheast.push.samsungosp.com:8088/spp/pns/api/push 05 Korea https://apkorea.push.samsungosp.com:8088/spp/pns/api/push 06 China https://apchina.push.samsungosp.com.cn:8088/spp/pns/api/push 7C Staging (AP Northeast) https://175.41.248.50:8088/spp/pns/api/push For instance, if the registration ID of the application that you want to send a notification to begins with 04, the URL of the RQM server must be https://apnortheast.push.samsungosp.com:8088/spp/pns/api/push.
- Create the notification message.
A message is one of the fields that constitute a notification. This message field contains not only the message to show in the quick panel on the device, but also the behaviors that the device should take when receiving the notification. This message field is a string that consists of key-value pairs. The available options are given in the following table.
Table: Message key-value pairs Key Value Description action ALERT: Store the message and alert the user. SILENT: Store the message without alerting the user.
DISCARD: Discard the message.
LAUNCH: Forcibly launch the app and deliver the notification.
Action to be performed if the application is not running. If action is not included, the default behavior is SILENT. alertMessage Up to 127 bytes Alert message shown to the user in the quick panel. If the action is not set as ALERT, this value is meaningless. badgeOption INCREASE: Increase the badge number by the given value. DECREASE: Decrease the badge number by the given value.
SET: Set badge number to the given value.
Option for updating the icon badge number. If the action is set as DISCARD, the badgeOption is ignored. If it is not included, the icon badge number remains unchanged. badgeNumber 0-999 - For example, to show a "Hi" message in the quick panel and increase the badge count by 1 when the notification arrives at the device, the message field of the notification must be as follows:
"badgeOption=INCREASE&badgeNumber=1&action=ALERT&alertMessage=Hi"
Note that this message field takes effect only when your application is not running (more precisely, when your application is not connected to the push service.) If a notification with the above message field arrives at the device where the application is running, the push service delivers the notification directly to the application, neither showing the "Hi" message in the quick panel nor increasing the badge count.
- Send notifications.
With the message field that you just created, you can construct a notification using a JSON query and send it to the RQM server using the POST method. The following list contains the details:
- URI: URI of the RQM server chosen based on the first 2 digits of the registration ID
- Method: POST
- Data: JSON
- Description: Request a notification push to a push client
- Note: Total request message body must be less than the system default value, 200 kb. If not, "3034 – error of too long chuned message data" is returned. System default value can be changed as needed.
- Header
There are 2 required fields: appID and appSecret.
The fields are given when you register your application, and they are used for application authentication. If either is missing, the push server rejects the request and returns "3046 – error of application authentication" error. Put these 2 parameters on the request header.
- Arguments
Table: Arguments Key Description Additional information regID Distinguish a recipient from other recipients by assigning a unique registration ID to each recipient. The registration ID is assigned when a third party application is installed in a device and marked to use an application service. The preloaded push client connects to the push server and registers the third party application. Then the push server returns the registration ID to the push client. The push client passes this ID to the third party application. The push server passes this registration ID to a third party server. For the rest of the applications, the third party application passes this registration ID to the third party server. This passing registration ID policy can change. required type: String
requestID A third party server needs to assign a request ID to each request. It enables distinguishing a request from others. required type: String
sender Information of the user who sends the notification. optional type: String
default: null
message The message the sender wants to deliver. It can be a multibyte character. It goes through the push server and push client from a third party server. The push client just passes it to the third party application so that it is needed to handle the message. Maximum message length must be less than 2 kb. Make sure that if there is no message and appData, the push server rejects the message and returns an error.
conditionally mandatory (if appData is null, this field is required) type: String
default: null
appData Third party applications can use this field to carry their own data. It is dependent on the type described below. Make sure that if there is no message and no appData, the push server rejects the message and returns an error.
conditionally mandatory (if message is null, this field is required) type: String
default: null
type This field lets the push client know how to deal with push notification messages. If this field is set to 0, it is a normal push notification to pass to an application. Number 1 is assigned for system message and 2 is assigned for errors. Between 10 and 100, they are embedded cases, such as 10: m.fluent. After a hundred, they are user-defined. optional type: int
default: 0
delayDate The time how long the server holds the request before sending the request to the push client. This is an optional field, so if this field does not exist, the server applies its default values as 0 (minute). If delayTime is 0, the push server delivers as soon as the push server receives the notification request. optional type: int
unit: minute
default: 0
reliableOption The push server guarantees reliable message delivery if the reliableOption is set. Possible options are the following: - NoReliable: Do not send any acknowledgment back to a third party server and do not store the notification in the push server if the push client did not receive the notification.
- Transport: Send an acknowledgment back to the third party server when the push client receives the notification.
- Application: Send an acknowledgment back to the third party server when a third party application checks the notification.
This is an optional field, so if this field does not exist, the server applies its default value as Transport. An acknowledgment at this point does not mean a response to the notification request, but an acknowledgment that the push client has received the notification. This acknowledgment as a form of JSON is sent to the app server by the push server through http when the push client receives the notification.
optional type: String
default: Transport
sessionInfo Connection information of an application. 3rd party applications can define this field by themselves. optional type: String
default: null
timeStamp Server time in milliseconds when a notification request has been made. optional type: long
default: null
connectionTerm The option determines whether it stays registered with the push client. If the value is 0, it stays registered. If the value is 1, it does not stay registered. optional type: int
default: null
- Example header
appID: 1234567890987654
appSecret: dYo/o/m11gmWmjs7+5f+2zLNVOc=
- Example request
{ "encoding" : "base64" <!--Optional--> "regID" : "ab123456", "requestID" : "0000001", "sender" : "oscal", <!--Optional--> "type" : 0 <!--Optional--> "message" : "badgeOption=INCREASE&badgeNumber=1&action=ALERT&alertMessage=Hi", <!--Optional--> "appData" : "{id:asdf&passwd:1234}", <!--Optional, (Opaque)--> "delayDate" : 60, <!--Optional--> "reliableOption" : "Transport", <!--Optional--> "sessionInfo" : "002002", <!--Optional--> "timeStamp" : 1234567890, <!--Optional--> } - Example response
If the push server receives a notification request, the server returns a JSON string that contains the regID, requestID, status code, and status message. If the request contains a malformed JSON format, requests are not processed and are returned without the regID and requestID values. If the request is of the JSON format but has invalid data, no requests are processed and are considered as an error. This return message only shows whether receiving notification request was successful. This return message does not deal with whether the push client receives the notification. The order of the return message is the same as the request message order.
The following example is shown if the request is successful:
{
   "results":
   [{
      "regID":"ab123456",
      "requestID":"0000001",
      "statusCode":1000,
      "statusMsg":"Success"
   }]
}
The following example is shown if the request fails due to malformation:
{
   "results":
   [{
      "regID":"",
      "requestID":"",
      "statusCode":3023,
      "statusMsg":"error of json mapping exception"
   }]
}
The following example is shown if the request fails due to abnormal data:
{
   "results":
   [{
      "regID":"ab123456",
      "requestID":"0000001",
      "statusCode":3008,
      "statusMsg":"error of not registered regID"
   }]
}
Handling Push Notifications
When a notification arrives at the device, it is delivered to the destination application in a manner that depends on whether the application is running.
To handle incoming push notifications:
- Receive notifications when the application is running.
When a notification arrives to your application while it is running (precisely, your application is connected to the service), the _noti_cb() function is called as defined in the push_service_connect() function. In this callback function, you can handle the received notification. The following example shows how your application can retrieve the app data (payload), message, and timestamp from the received notification:
static void _noti_cb(push_service_notification_h noti, void *user_data)
{
   int ret;

   char *data=NULL; // App data loaded on the notification
   char *msg=NULL; // Noti message
   long long int time_stamp; // Time when the noti is generated
   char *sender=NULL; // Optional sender information
   char *session_info=NULL; // Optional session information
   char *request_id=NULL; // Optional request ID
   int type=0; // Optional type information

   // Retrieve app data from noti
   ret = push_service_get_notification_data(noti, &data);
   // Your logic here to decrypt app data if it is encrypted

   // Retrieve notification message from noti
   ret = push_service_get_notification_message(noti, &msg);

   // Retrieve the time when notification is created from noti
   ret = push_service_get_notification_time(noti, &time_stamp);

   // Retrieve the optional information
   ret = push_service_get_notification_sender(noti, &sender);
   ret = push_service_get_notification_session_info(noti, &session_info);
   ret = push_service_get_notification_request_id(noti, &request_id);
   ret = push_service_get_notification_type(noti, &type);

   // Your implementation here to use data, msg, time_stamp, sender,
   // session_info, request_id, and type

   // Free all resources
   // Do not free noti in the callback function
   if (data)
      free(data);
   if (msg)
      free(msg);
   if (sender)
      free(sender);
   if (session_info)
      free(session_info);
   if (request_id)
      free(request_id);
}
When the _noti_cb() function is called, obtain the notification through the first parameter. The second parameter is the pointer to the user data. You can retrieve the app data, message, and time stamp from the handle using the push_service_get_notification_data(), push_service_get_notification_message(), and push_service_get_notification_time() functions respectively. Before exiting the function, free the data. However, do not free noti in the notification callback function. It is freed automatically right after this callback function.
- Receive notifications when the application is not running.
If the notification arrives when your application is not running, there are 3 ways to handle the notification:
- Forcibly launch the application and deliver the notification to it.
- Store the notification at the push service database and request it later when the application is launched.
- Discard it.
For the first option, you need to set the action to LAUNCH in the message field when sending the notification from the application server.
When such notification action arrives at the device, the push service forcibly launches your application and delivers the notification as a bundle. To retrieve the notification when launched, call the push_service_app_control_to_notification() function in the app_control() function, which is a callback function that is triggered when your application is launched by another application or process.
static void app_control(app_control_h app_control, void *data) { char *op = NULL; push_service_notification_h noti = NULL; int ret; if (app_control_get_operation(app_control, &op) < 0) { return; } // Retrieve noti from the bundle ret = push_service_app_control_to_notification(app_control, op, ¬i); if (noti) { // Your implementation for handling noti // Free the noti push_service_free_notification(noti); } else { // Your implementation for the case when // this app is not launched by the push service } if (op) free(op); }When you create your project in the SDK, the app_control() function is created automatically. When your application is launched by the push service, all related information regarding this launch request is delivered through the app_control argument. From this handle, retrieve the op operation using the app_control_get_operation() function. With app_control and op, retrieve the notification data using the push_service_app_control_to_noti_data() function. If your application is not launched by the push service, this function returns as NULL.
For the second option, you need to set the action to ALERT or SILENT in the message field when sending the notification from the application server. When such a notification arrives at the device, the push service keeps the notification in the database and waits for the request from the application. The difference of the 2 options is that the former shows the alert message in the quick panel and changes the badge count while the latter does not. If the user clicks the message in the quick panel, the push service forcibly launches the application and delivers the notification through the app control callback function as in the first option.
For the last option, you need to set the action to DISCARD in the message field when sending the notification from the application server. When such a notification arrives at the device, the push service discards the notification unless the application is running.
- Request unread notifications.
If the user does not launch the application from the quick panel, the application requests the unread notifications after start-up using the push_service_request_unread_notification() function as already introduced. The synchronous request using the push_service_get_unread_notification() function is shown below:
push_service_notification_h noti; int ret; do { ret = push_service_get_unread_notification(push_conn, ¬i); // Your implementation to process unread message noti push_server_free_notification(¬i); } while (1);Call this function repeatedly until no notification is returned. If there are multiple unread notifications, the notifications are retrieved in their arrival order. Note that the push_server_free_notification() function blocks the code while it receives a notification from the service. Unless you need a synchronous behavior, the asynchronous function is recommended.
Managing Security
When you send a notification with sensitive information, be aware of the chance that the notification is hijacked by someone else. It is your responsibility to keep such sensitive information safe from malicious access. The following instructions are strongly recommended:
- Keep your push app ID confidential.
If it is exposed, hackers can try to hijack your notifications using a fake application with the exposed ID.
- Do not store the registration ID on the device.
This ID can be seen as a destination address of the notifications. Without this ID, hackers cannot send fake notifications to your application.
- Encrypt sensitive information.
When you send sensitive information, such as personal information and financial transactions, encrypt it and load it to the notification as a payload. Do not load the information to the message field of the notification. When the notification arrives at the device, your application decrypts the payload and retrieves the sensitive information.
- Do not hardcode your AppSecret in your source code.
The AppSecret is a key to accessing the push server for sending notifications. If notifications are sent from your application server, your application does not need to know the AppSecret at all. Keep the AppSecret in the server and do not load any related information in your application. If you want device-to-device notification delivery without your application server, your application needs the AppSecret to send a notification from a device. In this case, it is your responsibility to keep the AppSecret safe.
