Graphic UI Component: Drawing Simple Images Using Evas Objects
This tutorial demonstrates how you can draw a rectangle or a line image on the screen using Evas objects available on the EFL UI component library.
Warm-up
Become familiar with the Evas API basics by learning about:
-
Drawing a Rectangle or Line
Draw a rectangle or a line object on the screen in a variety of size and color.
-
Implementing Gradation
Represent a gradation effect using the rectangle object.
-
Resizing Images
Adjust the loaded image size and draw on the screen.
Drawing a Rectangle or Line
The rectangle and line demo is implemented in the rectline.c file. It uses a UI component layout class, such as elm_layout and UI components, such as elm_image and evas_object_rect, and evas_object_line for the content inside view.
The EFL has the following types of non-container objects:
- Evas_Object_Rectangle
- Evas_Object_Image
- Evas_Object_Text
- Evas_Object_Line
- Evas_Object_TextBlock
- Evas_Object_Polygon
Each object has a visual appearance that can be drawn on the canvas.
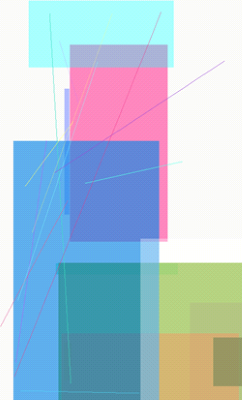
The create_main_view function creates 10 rectangles and 10 lines with random sizes and coordinates, and draws those objects on the evas. The color and the transparency of the object is also randomized.
The coordinates and sizes cannot be expanded beyond the screen size.
static Evas_Object*
create_main_view(appdata_s *ad)
{
   Evas_Object *layout, *rect, *line;
   Evas *e;
   int i;

   layout = elm_layout_add(ad->win);
   e = evas_object_evas_get(layout);

   // Draw rects
   for (i = 0; i <= 10; i++)
   {
      int x, y, w, h, r, g, b, a;
      x = rand() % 480;
      y = rand() % 800;
      w = rand() % 480;
      h = rand() % 800;
      r = rand() % 255;
      g = rand() % 255;
      b = rand() % 255;
      a = rand() % 255;

      rect = evas_object_rectangle_add(e);
      evas_object_resize(rect, w, h);
      evas_object_move(rect, x, y);
      evas_object_color_set(rect, r, g, b, a);
      evas_object_show(rect);
   }

   // Draw lines
   for (i = 0; i <= 10; i++)
   {
      int x1, y1, x2, y2, r, g, b, a;
      x1 = rand() % 480;
      y1 = rand() % 800;
      x2 = rand() % 480;
      y2 = rand() % 800;
      r = rand() % 255;
      g = rand() % 255;
      b = rand() % 255;
      a = rand() % 255;

      line = evas_object_line_add(e);
      evas_object_line_xy_set(line, x1, y1, x2, y2);
      evas_object_color_set(line, r, g, b, a);
      evas_object_show(line);
   }

   return layout;
}
The following figure illustrates the result.
Figure: Rectangles and lines

Implementing Gradation
The gradation demo is implemented in the gradation.c file. It uses a UI component layout class, such as elm_layout and UI components, such as elm_image and evas_object_rect, and evas_object_line for the content inside view.
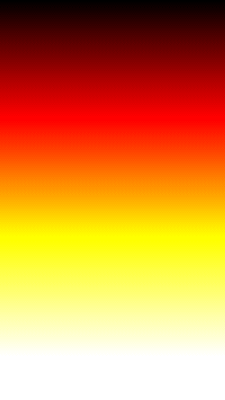
The sample application creates rows of small rectangles that eventually fill the screen, starts a new row when the earlier row gets to the end of the screen, and changes the color of the squares as the number of the rows increases.
static Evas_Object*
create_main_view(appdata_s *ad)
{
   Evas_Object *layout, *rect, *line;
   Evas *e;
   int i;

   layout = elm_layout_add(ad->win);
   e = evas_object_evas_get(layout);

   int x, y, w, h, r, g, b, a;
   x = 0;
   y = 0;
   w = 480;
   h = 10;
   r = 0;
   g = 0;
   b = 0;
   a = 255;

   // Draw rects
   for (i = 0; i < 200; i++)
   {
      rect = evas_object_rectangle_add(e);
      evas_object_resize(rect, w, h);
      evas_object_move(rect, x, y);
      y +=4;
      evas_object_color_set(rect, r, g, b, a);
      if (r < 255)
         r +=4;
      else if (g < 255)
         g +=4;
      else
         b +=4;

      evas_object_show(rect);
   }

   return layout;
}
The following figure illustrates the result.
Figure: Gradation

Resizing Images
The image resizing demo is implemented in the imageresize.c file. It creates image objects with random sizes and coordinates. It uses a UI component layout class, such as elm_layout and UI components, such as elm_image and evas_object_rect, and evas_object_line for the content inside view.
static Evas_Object*
create_main_view(appdata_s *ad)
{
   Evas_Object *layout, *img;
   char buf[PATH_MAX];
   int i;

   layout = elm_layout_add(ad->win);

   for (i = 0; i <= 10; i++)
   {
      int x, y, w, h;
      x = rand() % 480;
      y = rand() % 800;
      w = rand() % 480;
      h = rand() % 800;

      img = elm_image_add(layout);
      snprintf(buf, sizeof(buf), "%s/image.jpg", ICON_DIR);
      elm_image_file_set(img, buf, NULL);

      evas_object_resize(img, w, h);
      evas_object_move(img, x, y);
      evas_object_show(img);
   }

   return layout;
}
The following figure illustrates the result.
Figure: Image resizing


