Button
This feature is supported in wearable applications only.
The Elementary button component is a simple push button. It is composed of a label icon and an icon object and has an autorepeat feature.
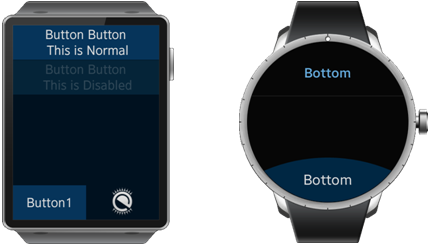
Figure: Button component

Figure: Button hierarchy

Adding a Button Component
Create a button.
Evas_Object *button, *parent;

// Create a button
button = elm_button_add(parent);
Adding an Icon Inside a Button
The icon can be updated with elm_object_part_content_set() function with the icon part name.
Evas_Object *ic;
ic = elm_icon_add(button);
elm_image_file_set(ic, "icon.png", NULL);
elm_object_part_content_set(button, "icon", ic);
Adding Text Inside a Button
The label can be modified using the elm_object_text_set() function.
elm_object_text_set(button, "Click me!");
Using Button Styles
Various styles can be used on the button. Tizen supports the following styles for the rectangular UI component:
- default
- green
- orange
- red
- nextdepth
Tizen supports the following styles for the circular UI component:
- default
- bottom
To change the style of the button, call the elm_object_style_set() function on the button object.
// Example for rectangular UI component
elm_object_style_set(button, "nextdepth");

// Example for circular UI component
elm_object_style_set(button, "bottom");
Using the Button Callbacks
The button emits the following signals:
- clicked: The user clicked the button (press/release).
- repeated: The user pressed the button without releasing it.
- pressed: The user pressed the button.
- unpressed: The user released the button after pressing it.
For all these signals the event_info parameter returned in the callback is NULL.
This is an example to register and define a callback function called by the clicked signal.
{
   evas_object_smart_callback_add(button, "clicked", clicked_cb, data);
}
// Callback function for the "clicked" signal
// This callback is called when the button is clicked by the user
void clicked_cb(void *data, Evas_Object *obj, void *event_info)
{
   dlog_print(DLOG_INFO, LOG_TAG, "Button clicked\n");
}
Using the Autorepeat Feature
The autorepeat feature is enabled by default. It consists of calling the repeated signal when the user keeps the button pressed. This feature can be disabled with the elm_button_autorepeat_set() function. The autorepeat is configured with the following functions:
- elm_button_autorepeat_initial_timeout_set(): to set the initial timeout before the autorepeat event is generated
- elm_button_autorepeat_gap_timeout_set(): to set the interval between two autorepeat events
Disable the autorepeat feature.
elm_button_autorepeat_set(button, EINA_FALSE);
Enable the autorepeat feature.
elm_button_autorepeat_set(button, EINA_TRUE);
Set the initial timeout to five seconds.
elm_button_autorepeat_initial_timeout_set(button, 5.0);
Set the gap between two signals to 0.5 seconds.
elm_button_autorepeat_gap_timeout_set(button, 0.5);

